How To Make Your Own Alabama Rig
Hey there, fishing buddy! Ever seen one of those Alabama Rigs and thought, "Whoa, what IS that contraption?" And then, probably, "Can I make that myself?" Well, buckle up, because today we're diving headfirst into the wonderful world of DIY Alabama Rigs. No fancy fishing guru required, just a little bit of tinkering and a whole lot of fun. Think of it as crafting your own secret weapon, a sure-fire way to make those bass go absolutely bonkers.
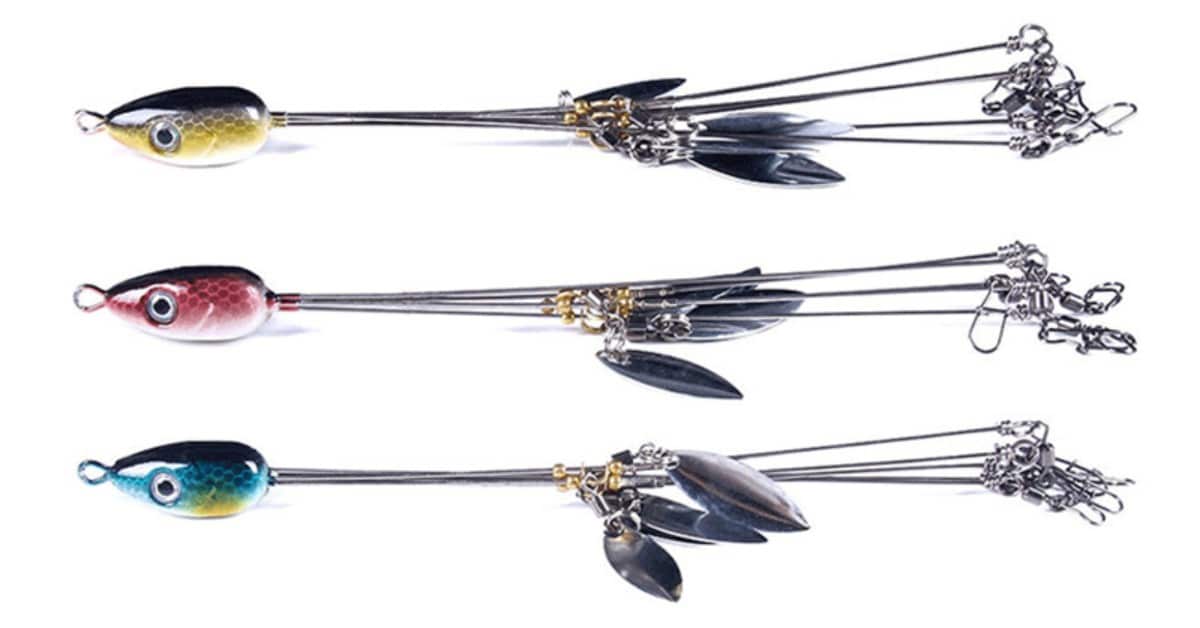
So, what exactly is an Alabama Rig, anyway? It's basically a bunch of lures, usually swimbaits, all rigged up on wires that branch out from a central head. Like a metallic octopus, but way more deadly to fish. The whole idea is to mimic a school of baitfish, and honestly, it works like a charm. You've seen those pictures, right? The ones where guys are holding up piles of fish, all caught on one rig? Yeah, that's the Alabama Rig effect. Pretty wild, huh?
Now, before we get our hands dirty, a quick little disclaimer. Alabama Rigs aren't legal everywhere. So, do your homework, check your local regulations. We don't want any fishing fun police showing up, do we? Safety first, then fish! But if they're legal where you are, and you're ready to up your game, let's do this thing.
Must Read
The "Why" Behind the Rig
Why bother making one when you can buy 'em? Well, for starters, it's way cheaper. Those pre-made rigs can cost a pretty penny. Plus, making your own lets you customize everything. You get to choose the exact colors, the size of the swimbaits, even how many arms your rig has. It's like building your own superhero costume, but for fishing. You get to decide the superpowers!
And let's be honest, there's a certain satisfaction in catching a fish on something you built yourself. It's a little extra pride, a little extra "I totally schooled that fish with my own creation!" moment. Plus, if you break one (and trust me, you might), you can just whip up another one. No need to run to the tackle shop every time. Efficiency, my friends, efficiency.
Think about it. You're out there, the sun's shining, the water's calm (or maybe a little choppy, who knows?), and you've got this custom-made marvel on your line. It's almost like cheating, but it's totally legit. Almost.
Gathering Your Arsenal
Alright, let's talk about what you'll need. Don't worry, it's not rocket science. Mostly stuff you can find at a decent hardware store or a well-stocked fishing shop. Think of this as your shopping list for angler immortality. Or at least a good fishing trip.
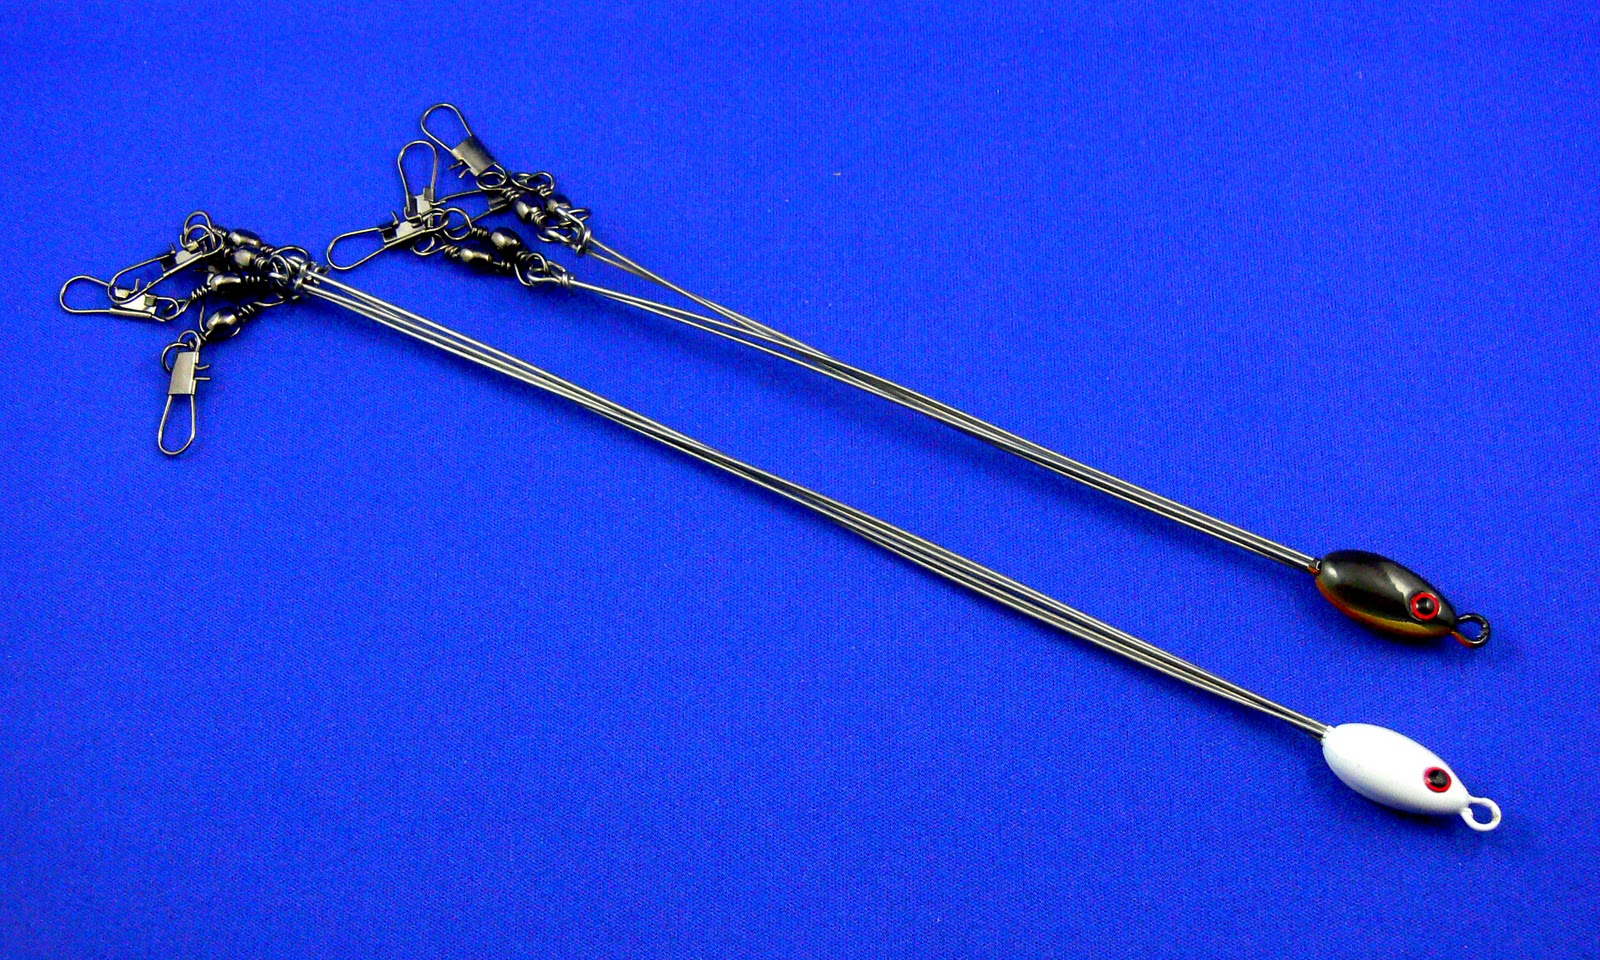
The Foundation: The Rig Head
This is the central hub, the command center of your Alabama Rig. You've got a few options here. Some folks use a specialized umbrella rig head, which is basically a lead head with a bunch of screw-lock swivels built-in. Super handy, makes things easy. You can find these online or at your favorite tackle shop. They usually have places to attach your wires.
Another option, if you're feeling a bit more DIY-er-ish, is to use a regular heavy jig head. Then, you'll need to get a little creative with how you attach your wires. We'll get to that. Some people even use a spinnerbait head with the blade removed. Ingenuity, folks, it's the name of the game.
The key thing here is that it needs to be sturdy. This rig is going to take some abuse. You're casting it, reeling it, and hopefully, it's going to be wrestling with some hefty bass. So, pick a head that can handle it. We don't want any catastrophic rig failures, do we? Imagine the shame!

The Arms: Wire and Swivels
Now for the branching out part. You'll need some kind of wire. Stainless steel leader wire is your friend here. Think of the stuff you use for big toothy critters like pike or musky, but maybe a little thinner. You want it stiff enough to hold its shape and keep those lures spread out, but not so stiff that it's impossible to work with. About 12- to 20-pound test is usually a good range.
You'll also need some swivels. Ball-bearing swivels are the best, in my humble opinion. They spin freely and prevent line twist. You'll attach these to the end of each wire arm. And at the other end of each swivel? That's where your lure goes. Simple, right? Like a little fishing daisy chain.
How many arms? The classic Alabama Rig has five. But hey, you can go rogue! Some people use three, some use seven. It's your rig, your rules. Just make sure your rod and reel can handle the extra weight and drag, okay? Don't want to snap your favorite rod on the first cast.
The Bait: The Shiny Bits
This is where the magic really happens. You're going to need some lures. Swimbaits are the most popular choice. Think little plastic fish that wiggle and wobble. You can get them in all sorts of sizes and colors. This is where you can really let your creativity shine. Match the hatch, or go for something completely outrageous. Bass are sometimes attracted to the shiny, flashy stuff, you know?
The key here is consistency. You generally want your swimbaits to be the same size. This makes the rig look more like a school of baitfish. You don't want one giant baitfish swimming around with a bunch of tiny ones. That just looks odd. And fish are, shall we say, particular about their meals. Consistency is key to that natural baitfish school illusion.
Spinnerbait blades can also be added to some of the arms. This adds extra flash and vibration, which can be irresistible to predatory fish. So, don't be afraid to experiment with different lure combinations. Think of it as a buffet for bass. Variety is the spice of life, and apparently, the spice of catching fish.
Putting It All Together: The Build Process
Okay, let's get our hands dirty. This is the fun part, the construction phase. Imagine you're a mad scientist, but instead of creating monsters, you're creating fish-catching machines.
Step 1: Prepping the Wires
First, cut your leader wire into the desired lengths for your arms. You'll want them all to be roughly the same length, or at least close. Then, you'll need to crimp or tie on your swivels to one end of each wire. Crimping is usually the most secure way to go. You'll need crimp sleeves and a crimping tool for this. If you're tying, make sure you know some strong fishing knots, like a double uni-knot or a perfection loop.
Pro tip: leave a little extra wire for the crimp or knot so it doesn't pull out. We're not aiming for any last-minute line failures here. Think of it as a safety net for your fishing dreams.
Step 2: Attaching to the Rig Head
Now, this is where your rig head choice comes into play. If you have a specialized umbrella rig head with screw-lock swivels, you'll simply screw the other end of each wire arm into the designated spots. Easy peasy, lemon squeezy. No pun intended. Or maybe a little pun intended.
If you're using a regular jig head, you might need to get a little more inventive. Some people use a large split ring to attach the wires to the eye of the jig head. Others will use a wire loop that goes around the jig head. You can also find specially designed wire harnesses that attach to a jig head, giving you multiple connection points. Again, check out what's available; there are often clever solutions out there.
The goal is to have those wires radiating outwards from the head, creating that multi-lure spread. You want them to be spaced out enough so your lures aren't all tangled up when you cast. A little bit of spacing goes a long way.
Step 3: Adding the Baits
This is the moment of truth for your lures. You'll rig your swimbaits onto jig heads (if they don't already have them) and then attach those jig heads to the swivels on your wire arms. Make sure the hook is properly embedded in the swimbait so it's weedless, or at least mostly weedless. Nobody likes fishing for weeds, do they?
When you're rigging your swimbaits, try to rig them so they swim true. That means the hook is perfectly straight and the swimbait is running straight through the water. If your swimbait is wobbling or spinning, it's going to create a lot of drag and potentially tangle your rig. Take your time with this part.
Consider the order. If you're adding spinnerbait blades, put them on some of the arms. Then attach your swimbaits to the remaining arms. Experiment with different combinations. Maybe three swimbaits and two blades? Or two swimbaits and three blades? The possibilities are endless!
Step 4: The Finishing Touches and Testing
Once everything is rigged up, give it a good once-over. Are all the crimps secure? Are the knots tied tight? Are the swimbaits rigged properly? Does it look like a fearsome school of baitfish ready to wreak havoc? If you answered yes to all of those, you're probably good to go.

Before you hit the water, it's a good idea to give it a test run in your yard or in a calm body of water. Just cast it out and reel it in slowly. See how it tracks. Do the swimbaits look natural? Are any of the arms tangled? Make any necessary adjustments. This is your chance to fine-tune your creation.
And hey, if it looks a little wonky, don't sweat it. The fish might not be as discerning as you think. Sometimes, even a slightly imperfect rig can be deadly. It's all part of the learning process!
Tips for Using Your Homemade Rig
So, you've built your masterpiece. Now, how do you use this bad boy effectively? It's not just about throwing it out there and hoping for the best. There's a little bit of finesse involved.
Casting and Retrieving
Alabama Rigs can be a bit heavy, so you'll want a rod and reel that can handle it. A medium-heavy to heavy power rod with a good retrieval ratio is ideal. Think of it as casting a miniature football jig, but with more arms. You want to be able to make accurate casts, especially around cover.
When you retrieve, vary your speed. A steady retrieve is good, but so is an erratic one. Sometimes, pausing the retrieve will trigger a strike. Experiment with different retrieves to see what the fish are responding to. Think of it as mimicking a fleeing school of baitfish. They don't always swim in a perfectly straight line, do they?
And be ready for a bite! When a fish hits an Alabama Rig, it's often a hard strike. Don't hesitate to set the hook. You've got multiple hooks in the water, so you have a good chance of getting them all in. It's a glorious feeling, let me tell you.
When to Deploy Your Rig
Alabama Rigs are especially effective when the bass are schooled up, feeding on baitfish. This often happens in the spring and fall, but can occur at any time of year. Look for signs of baitfish activity on the surface, like jumping fish or birds diving. That's your cue to deploy the rig!
They're also great for covering water. Because you have multiple lures, you're essentially presenting multiple opportunities for a fish to strike. It's like having a whole bait spread all in one package. Talk about efficiency!

However, remember that rule about checking local regulations. Some places might have restrictions on the number of hooks you can have in the water. So, always be aware of where you're fishing.
Troubleshooting Your Rig
What if your rig isn't swimming right? Is it spinning? Is it diving too deep? Don't panic! Most issues can be fixed with a few simple adjustments.
If your rig is spinning, it could be that your swimbaits are rigged crooked. Take them off and re-rig them so they swim true. Also, check that your swivels are spinning freely. Sometimes, a cheap swivel can cause problems.
If your rig is diving too much, you might be using too heavy of a jig head on your swimbaits, or the weight of the rig head itself is too much. Try lighter jig heads, or perhaps a less dense swimbait material.
If the arms are tangling, you might need to adjust the spacing between them. A little more spread can help keep them separated during the cast and retrieve. And always, always make sure your line isn't twisted from previous casts.
The Joy of the DIY
So there you have it, folks! Making your own Alabama Rig is not only a cost-effective way to fish, but it's also incredibly rewarding. You get to be creative, experiment with different lure combinations, and ultimately, you get to experience the thrill of catching fish on a lure you built with your own two hands. How cool is that?
It’s more than just a fishing tool; it's a project, a hobby within a hobby. It’s about the process, the anticipation, and the sweet, sweet success. So next time you're thinking about hitting the water, consider a little DIY fishing magic. You might just surprise yourself with what you can create. And more importantly, you might just surprise those bass!
Happy building, and even happier fishing!