Lenovo Boot In Safe Mode Windows 10

Okay, so your Lenovo laptop is acting a bit… well, like a grumpy teenager who’s had too much sugar and isn't listening to anyone. You know the feeling, right? Things are slow, weird pop-ups are doing the cha-cha, and your trusty machine seems to be channeling its inner sloth. Don't panic! We're about to embark on a mini-adventure to get your Windows 10 back in tip-top shape, and it's way easier than assembling IKEA furniture without the instructions (and trust me, I've been there, it's a dark place).
Imagine your computer is like a superhero. Most of the time, it’s out there saving the day, zipping through tasks, and generally being awesome. But sometimes, even superheroes need a little break to figure out what went wrong. That’s where our special mission comes in: booting into Safe Mode. Think of it as your Lenovo’s secret hideout, a quiet place where it can shed all the unnecessary distractions and focus on what's truly important – running smoothly!
So, how do we get to this magical hideout? It’s not a secret handshake or a password whispered in the dead of night. It’s actually pretty straightforward, and before you know it, you’ll be a Safe Mode ninja. Let’s get started!

Operation: Safe Mode Activation!
First things first, make sure your Lenovo is powered on. If it’s currently stuck in a digital coma, you might need to give it a gentle nudge (a polite press of the power button will do the trick). Once it’s groaning to life, here’s where the fun begins.
You'll want to get to the Windows Recovery Environment. Think of this as the control room, where all the important decisions are made. The easiest way to get there, especially if your computer is misbehaving, is to do a little trick. When you see the Windows logo appearing (or even if it’s just showing that spinning circle of doom), go ahead and press and hold the power button until your laptop shuts down completely. Yes, it feels a bit dramatic, but trust us, it’s like a digital reset button. Do this a couple of times. Your laptop is smart enough to realize something’s up and will eventually say, “Okay, okay, I get it! You want the fancy stuff!”
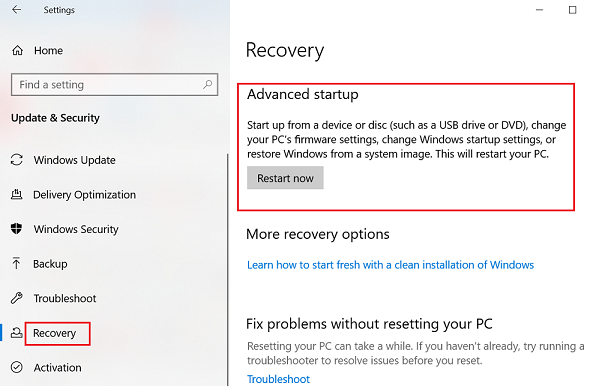
After doing this a couple of times, your Lenovo should surprise you with a screen that says, “Automatic Repair.” This is a good sign! It means your laptop is trying to fix itself. Let it do its thing for a bit. If it magically fixes itself and boots up normally, high five yourself and maybe go grab a snack. But if it’s still being stubborn, you’ll see another option appear: “Advanced options.” Bingo! Click on that, and prepare to enter the command center.
This is where the real magic starts to happen. You’re now looking at a whole bunch of options, like a digital buffet of fixes. Don't be intimidated by all the buttons and menus. We’re just going to navigate a few of them.
Next up, you’ll see a screen that says “Troubleshoot.” This is your next destination. Think of it as the “Get Out of Jail Free” card for your computer. Click on “Troubleshoot.”
Now, you’re presented with even more options. We’re looking for the one that says “Advanced options” again. See a pattern here? We’re digging deeper!
And finally, the moment of truth! You’ll see a list of options that includes “Startup Settings.” This is it! The golden ticket to Safe Mode. Click on “Startup Settings.”
Now, your Lenovo will present you with a list of startup options. You’ll see things like “Enable low-resolution video mode” and “Disable automatic restart on system failure.” We’re not interested in those right now. We’re looking for the ones that say “Enable Safe Mode.” You’ll see a few variations, like “Enable Safe Mode,” “Enable Safe Mode with Networking,” and “Enable Safe Mode with Command Prompt.”
For most of us, “Enable Safe Mode” is all you need. It’s like the basic troubleshooting mode. If you need to access the internet while in Safe Mode (perhaps to download a fix), then “Enable Safe Mode with Networking” is your friend. For the truly adventurous and tech-savvy, “Enable Safe Mode with Command Prompt” is an option, but unless you’re fluent in computer-speak, it’s probably best to stick with the first two.
To select your desired Safe Mode, just press the corresponding number key on your keyboard. So, if you want the basic “Enable Safe Mode,” press the number 4. If you want the one with internet access, press the number 5. Easy peasy, lemon squeezy!
And voilà! Your Lenovo will now reboot into Safe Mode. You’ll notice the screen might look a little… basic. The colors might be a bit dull, and you’ll see the words “Safe Mode” in the corners of your screen. This is exactly what we want! It means your computer is stripped down to its essentials, running only the most critical programs. It’s like your Lenovo wearing its pajamas and no makeup, ready to focus on getting better.
Now that you’re in this digital spa, you can try to figure out what was making your laptop throw a tantrum. Did you install a new program recently? Did a dodgy website try to sneak something onto your machine? In Safe Mode, you can often uninstall problematic software, run antivirus scans, or simply see if the annoying issues disappear. If everything works perfectly in Safe Mode, you’ve narrowed down the problem significantly! It’s like finding the one rogue sock that was ruining your entire laundry load. Success!
Once you’re done with your Safe Mode adventure, you can get your Lenovo back to its normal, flashy self by simply restarting it. Just go to the Start menu, click the power icon, and select “Restart.” Your computer will then boot up as usual, hopefully a lot happier and healthier. You’ve officially conquered the Lenovo Boot In Safe Mode Windows 10 challenge. Go you!