How To Wire Multiple Lights And Switches On One Circuit
Alright, folks, gather 'round! Ever looked at a room and thought, "You know what this place needs? More light! And maybe a few more ways to control that light without playing hopscotch across the furniture." Well, you've come to the right place! We're about to dive into the magical world of wiring multiple lights and switches on a single circuit. It's not rocket science, though sometimes it might feel like you're building your own personal spaceship for illuminating your living room.
Imagine this: you're cozied up on the couch, a good book in hand, and suddenly the perfect mood lighting strikes you. But wait! That single, dim overhead fixture just isn't cutting it. You want a little sparkle here, a gentle glow there, all at your fingertips. This is where our wiring adventure begins, transforming your ordinary abode into a haven of adjustable luminescence.
So, what are we talking about? Basically, we're taking a single electrical pathway – the circuit – and making it do double, triple, or even quadruple duty for your lighting needs. Think of it like a superhighway for electricity, and we're adding multiple on-ramps and off-ramps for your lights. No more running extension cords that look like a tangled spaghetti monster!
First things first, let's get our heads around the key players. We've got our trusty power source, usually lurking in your main electrical panel (don't worry, we're not going in there just yet!). Then we have our wires, the unsung heroes carrying that precious juice. And of course, the stars of our show: the lights themselves and the switches that give us the power to play conductor of our own light orchestra.
The Grand Scheme of Things
The beauty of wiring multiple lights and switches on one circuit is the glorious simplicity it brings. Instead of needing a separate circuit for every single lamp and light fixture, we can cleverly link them all together. This is all about smart design, making your home function with a touch of electrical elegance.
Think about a hallway with a ceiling light and maybe some wall sconces. Instead of needing two separate circuits, we can often wire them all to one. This means less clutter in your electrical panel, fewer wires snaking through your walls (which is a win for everyone, trust me), and a more streamlined approach to home electrical.
It's like setting up a fantastic party. You've got your main power (the DJ), and then you can plug in all your different speakers (the lights) and have one central control for the volume (the switch). Everyone gets to enjoy the music, and you don't have to fiddle with a million knobs.
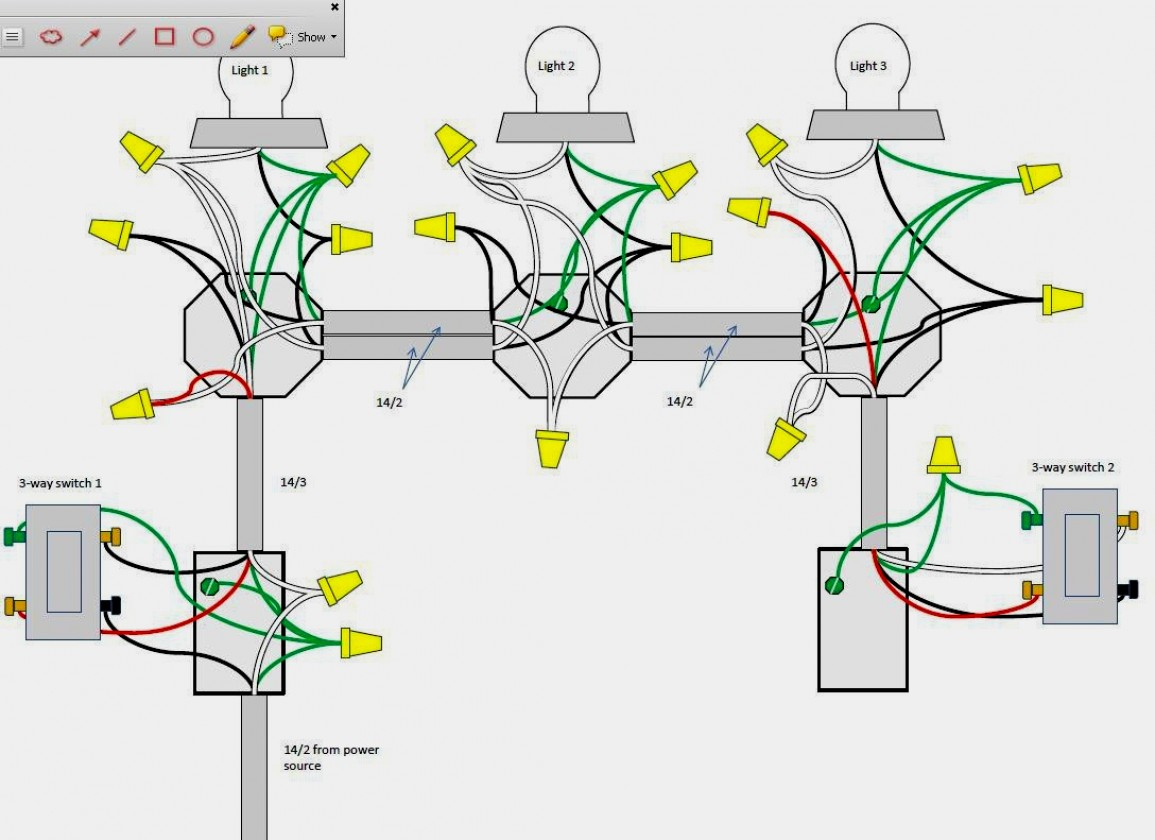
The Backbone: Understanding Your Circuit
Before we get our hands dirty (metaphorically speaking, of course – safety first!), it’s good to have a general idea of what makes up a circuit. Think of it as a complete loop that electricity travels. It starts at the power source, goes through your switch, then to your lights, and then back to the source.
When we're talking about multiple lights and switches on one circuit, we're essentially creating branches off this main loop. It’s like having a main river and then smaller streams that all eventually lead back to the same ocean. The electricity flows to each component, and the switch acts as the gatekeeper for the whole gang.
So, instead of a single path for each light, we're creating a network. This network is powered by a single breaker in your electrical panel. This breaker is your ultimate emergency shut-off, the superhero cape for your circuit, ready to swoop in and cut the power if anything goes haywire.
The Magic of Series vs. Parallel (Don't Panic!)
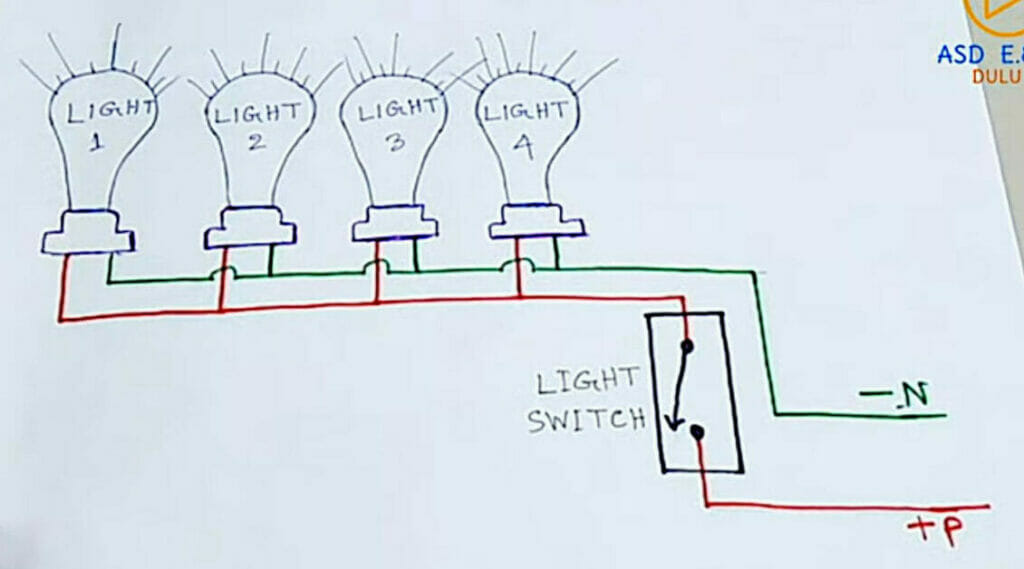
Now, you might hear whispers of "series" and "parallel" wiring. For our purposes here, we're mostly going to be dealing with parallel wiring. This is the good stuff, the stuff that makes your lights all work independently and happily.
In parallel wiring, each light gets its own direct path back to the switch and the power source. If one light bulb decides to retire early (a burnout, as they say), the others keep shining brighter than a supernova. This is the kind of reliability we crave!
Imagine a string of Christmas lights. If one bulb goes out in a series circuit, the whole string dies – a holiday tragedy! But in a parallel setup, it's more like individual light strands. One goes out, and the party continues with the rest. We want the "party continues" kind of wiring, right?
So, when we wire multiple lights, we're aiming for this parallel arrangement. It's all about giving each light its own lane on the electrical highway. This ensures that if one light decides to take a little nap, the others are unaffected and continue to illuminate your world with glee.
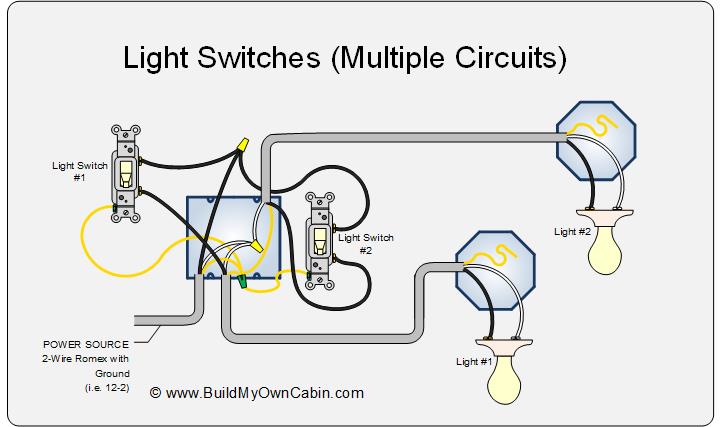
Putting It All Together: The Basic Idea
Let's paint a picture. You've got your main power coming in, usually from a junction box or directly from the panel. This power then goes to your switch. Think of the switch as the traffic cop for this entire group of lights.
From the switch, the power splits and travels to each of your lights. Each light fixture then has its own connection back, completing the circuit. It's a beautiful dance of electrons, all orchestrated by your simple flip of a switch.
So, the power flows into the switch. When the switch is "on," it allows that power to travel out and branch off to all your connected lights. Each light then gets its turn to shine before the electricity heads back to complete the loop. It’s efficient, it’s elegant, and it makes life so much easier.
The Humble Switch: Your Control Center
Now, about those switches! When wiring multiple lights on one circuit, your switch becomes the commander-in-chief. A single single-pole switch is usually what you'll be using for this kind of setup.
This type of switch is the most basic and common. It's either on or off, simple as that. When it's "on," it closes the circuit, allowing electricity to flow to all your lights. When it's "off," it opens the circuit, shutting down the power to the entire group.
Think of it like a master key. One turn of this key unlocks the power for all your lights. No need for multiple keychains for each individual light – just one powerful switch to rule them all! It's the ultimate in convenience and control.
This means you can have a switch at the entrance of a room that controls the overhead light, some accent lights, and even a decorative chandelier. One flip, and BAM! Your room transforms. It’s a little bit of magic at your fingertips.
Wiring the Lights: The Joy of Connections
When you're connecting the lights themselves, you'll be dealing with a few wires. Typically, you'll have a hot wire (often black), a neutral wire (often white), and a ground wire (often bare copper or green).
For our parallel setup, the hot wire from the switch will branch out to each light's hot terminal. Similarly, the neutral wire from the source will branch out to each light's neutral terminal. And the ground wire? It's the safety net, connecting to the ground terminal on each fixture.
Think of the hot wire as the messenger carrying the command from the switch. The neutral wire is the return path, bringing the message back. And the ground wire is the guardian angel, there just in case things get a little too exciting.
You'll be making these connections in junction boxes or directly within the light fixture's wiring compartment. Using wire nuts to secure these connections is a must. They’re like little plastic huggers for your wires, keeping everything snug and safe.
Safety First, Always!
Now, before you get too excited and start redecorating your entire electrical system, a friendly reminder: safety is paramount. If you're not absolutely confident in what you're doing, or if you've never done any electrical work before, it's always best to call in a qualified electrician.
Messing with electricity can be seriously dangerous, and we don't want any sparks flying where they shouldn't be! Think of it this way: you wouldn't try to perform your own appendectomy, right? Same principle applies here.
However, if you're comfortable and have some basic knowledge, understanding these principles is a fantastic step. It empowers you to make smart decisions about your home's lighting and to appreciate the invisible magic that makes it all work.
So, go forth and illuminate your world! With a little knowledge and a lot of caution, you can create a home that's not just lit, but brilliantly and conveniently lit. It’s your space, after all, and you deserve to control the light with a flourish!