How To Install Resistors For Led Turn Signals
So, you've decided your trusty vehicle needs a little sparkle, a touch of personal flair. Perhaps you've just scored a set of those dazzling, super-bright LED turn signals that are all the rage. They look fantastic, sleek and modern, like tiny futuristic beacons. But then you run into a little… quirk. Your turn signals start blinking like a hyperactive disco ball, or worse, not at all!
Don't fret, fellow car enthusiasts and DIY adventurers! This is where our unsung hero, the humble resistor, waltzes onto the stage. Think of it as the traffic cop for your car's electrical signals, making sure everything flows smoothly and at the right pace. Without it, your LEDs get confused, like a toddler with too many toys. And honestly, who wants confused turn signals? It’s not a good look for anyone.
Imagine your car's electrical system as a bustling city. The turn signal switch is the mayor, and the bulbs are the citizens. When you switch on your turn signal, the mayor sends a message to the citizens. Now, with your old incandescent bulbs, those citizens were pretty chill. They took their sweet time lighting up and going out, a leisurely pace that the city was used to.

But LEDs? Oh, these guys are wired differently! They're like lightning bolts of light, zipping on and off in the blink of an eye. Your car's electrical system, however, is still operating on its old, leisurely schedule. It’s like asking a snail to keep up with a cheetah. This mismatch is what causes that frantic blinking or complete silence.
Enter the resistor. This little gadget is like a friendly speed bump for the electricity heading to your LED turn signals. It’s not there to stop the flow, oh no. It’s just there to say, "Whoa there, speedy lights! Let's all get along at a nice, consistent rhythm, shall we?" This ensures your car’s “brain” thinks everything is perfectly normal, just the way it likes it.
Now, let's talk about the stars of our show: the resistors themselves. You'll likely encounter what are known as "load resistors" or "LED resistors". They come in various shapes and sizes, but they all perform the same crucial job. Some are small and cylindrical, like little metallic candies. Others are larger and often have fins, looking like miniature heat sinks ready to tackle a tough workout.
These fins are important, by the way. When electricity flows through a resistor, it generates a bit of heat. It’s like your phone getting warm after a long call. These fins help dissipate that heat, keeping the resistor from getting too toasty. It’s the resistor’s way of saying, "I’m working hard, but I’ve got this!"
So, where do you get these magical little components? Well, your local auto parts store is a treasure trove. You can also find them online from various automotive suppliers. When you're shopping, make sure you get resistors that are specifically designed for automotive use. They're built to handle the vibrations and temperature swings that come with being in a car. Trust me, you don't want your resistors melting away on a hot summer day!
The most common type you'll see are 6-ohm resistors, often with a wattage of 50 watts. Don't let the numbers scare you. Think of the ohms as the "amount of slowdown" and the watts as the "heat-handling capacity." For most LED turn signal applications, a 6-ohm, 50-watt resistor is the go-to choice. It's like the universally accepted handshake for your LEDs and your car's electrical system.
Now, let's get our hands a little dirty, shall we? The actual installation is usually quite straightforward. You’ll be working with your car’s wiring, which might sound intimidating, but we’ll take it slow. First, and this is super important: disconnect your car’s battery. Seriously, pull that negative terminal off like it owes you money. Safety first, always!
Once the battery is disconnected, you'll need to locate your existing turn signal bulbs. This often involves popping off a lens cover or reaching behind the bumper. It can feel like a mini treasure hunt, deciphering your car’s inner workings. Sometimes, you might even need a few extra hands, or a good flashlight and a lot of patience. That’s part of the fun, right? The thrill of discovery!
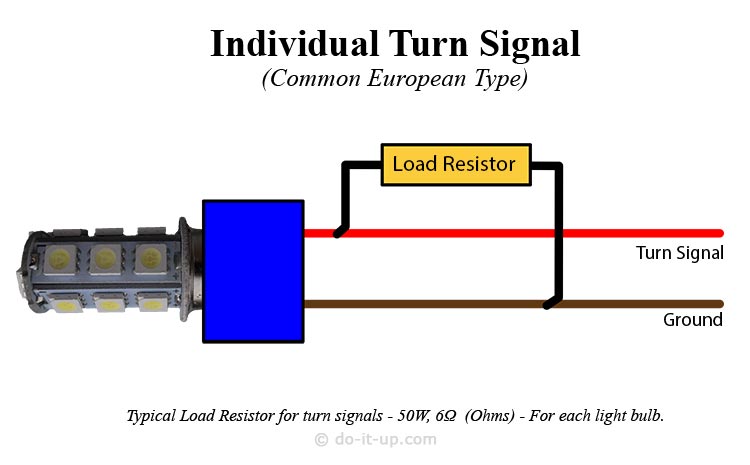
The goal is to wire the resistor in parallel with your new LED turn signal bulb. What does "parallel" mean? Imagine two roads. Instead of one road feeding into another, you have two roads that run alongside each other for a bit before rejoining. That’s parallel wiring for your resistor and your LED.
You’ll typically need to make some connections to your car’s existing wiring harness. This is where those handy wire strippers and crimp connectors come in. You might be thinking, "Crimp connectors? That sounds complicated!" But it's really just like giving two wires a firm handshake to make them stick together. Many kits come with these, making it even easier.
You'll want to tap into the wires that go to your turn signal bulb. One wire is usually for the signal itself, and the other is the ground. You’ll connect one end of the resistor to the signal wire and the other end to the ground wire. This allows the electricity to flow through both the LED and the resistor simultaneously.
Think of it as giving the electricity a choice: it can go through the bright, eager LED, or it can take a little detour through the helpful resistor before reaching the LED. This detour is what convinces the car’s electrical system that a normal bulb is still there. It’s a clever little trick, isn’t it?
Now, here’s a pro-tip from your friendly neighborhood car tinkerer: use heat shrink tubing! After you’ve made your crimped connections, slide a piece of heat shrink tubing over the connection and gently heat it with a heat gun or even a carefully used lighter. It will shrink down and create a snug, insulated seal, protecting your work from moisture and shorts. It’s like giving your wires a cozy, protective sweater.
Once you've got the resistor wired up on one side, repeat the process for the other side. You’ll be a seasoned pro by then! Then, and only then, reconnect your car’s battery. Take a deep breath, hop in your car, and flip on those turn signals. Watch in amazement as they blink with a smooth, consistent rhythm, just like they were designed to.
There’s a genuine sense of accomplishment that comes with this. You've taken something that was a bit quirky and made it perfect. You’ve tamed those wild LEDs and brought harmony back to your car’s signaling system. It’s a small victory, perhaps, but a victory nonetheless. And that feeling? That’s worth more than any fancy tool.

So, the next time you see a car with super-bright, perfectly blinking LED turn signals, you'll know the secret. You'll know about the unsung hero, the little resistor, working quietly behind the scenes. And who knows, maybe you'll be inspired to tackle your own little car upgrade project. Happy tinkering!