How To Fix A Corrupted External Hard Drive Without Formatting
Oh no! That dreaded moment has arrived. You’re happily rummaging through your precious photos, important documents, or maybe that epic collection of cat videos you’ve been curating, and BAM! Your external hard drive throws a tantrum. It’s suddenly acting all shy, refusing to open, or worse, showing you a cryptic error message that sounds like it was written by a robot on a bad day. It’s like your digital best friend has suddenly decided to speak in tongues. Don’t panic! Before you resign yourself to the abyss of formatting and losing all your digital treasures, let’s try a few… shall we say… gentle nudges to wake it up.
Think of your external hard drive like a slightly grumpy but ultimately lovable pet. Sometimes, it just needs a good pat on the head, a different treat, or a change of scenery. We're not going to perform brain surgery here; we're just going to try some simple, non-invasive techniques to coax it back into cooperating. Imagine we’re trying to convince a stubborn toddler to eat their peas – a little persuasion, a lot of patience, and hopefully, no tears.
First things first, let’s consider the most basic, yet often overlooked, solution: the good old unplug and replug. Yes, it sounds ridiculously simple, but sometimes that’s all it takes. Think of it as a digital deep breath. Unplug your external hard drive from the computer. Make sure it’s completely disconnected. Then, give it a good thirty seconds to a minute of quiet contemplation. No peeking! Then, plug it back in. Sometimes, a fresh connection is all the hard drive needs to re-establish its communication lines. It’s like saying, “Okay, let’s try this again, shall we?”
If that didn’t quite do the trick, let’s move on to a slightly more involved, but still very gentle, approach. We’re going to ask your computer to give the drive a little “check disk”. This is like sending a friendly inspector to see if everything is in order on the drive. For our Windows-loving friends, this is where the magical CHKDSK command comes into play. Don’t let the scary name fool you; it’s your friend! You’ll want to open up the Command Prompt. Don’t worry, we’re not going to be doing any complex coding. Just type cmd into your Windows search bar and hit enter. Now, in that black window that pops up (which might look intimidating, but trust me, it’s just a chat interface for your computer), you’ll type: chkdsk [your drive letter]: /f. Replace [your drive letter] with the actual letter assigned to your external hard drive (like E:, F:, or G:). The /f part is like telling the inspector, “And if you find anything wrong, please fix it!” Then, hit enter and let it do its thing. It might take a while, especially if your drive is a bit… uh… enthusiastic with its data. Grab a snack, binge a few episodes of your favorite show, or maybe even take a nap. This process is like giving your drive a spa treatment. It’s cleaning up any little digital cobwebs or misplaced data bits that are causing the fuss.
Now, if you’re a Mac user, don’t feel left out! Your Mac has its own built-in superhero for this situation, and it’s called Disk Utility. Fire up your Applications folder, then head to Utilities, and there it is: Disk Utility. Select your external hard drive from the sidebar. Once it’s highlighted, you’ll see a button that says “First Aid”. Click that. Think of First Aid as a digital doctor giving your drive a quick check-up and a gentle band-aid for any minor boo-boos. It will scan for errors and, if it finds any, it will try to repair them automatically. It’s like your Mac saying, “Let me take a look, and I’ll see what I can do to make things right.”
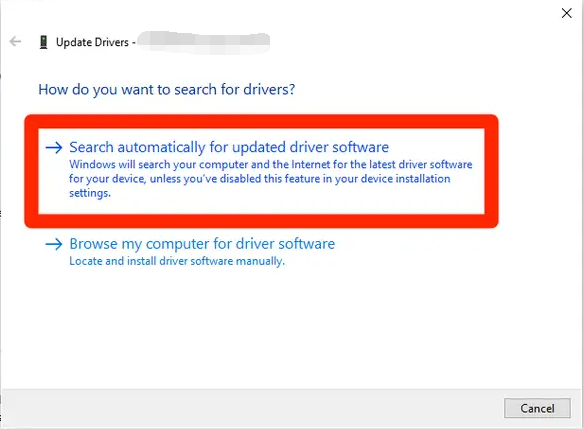
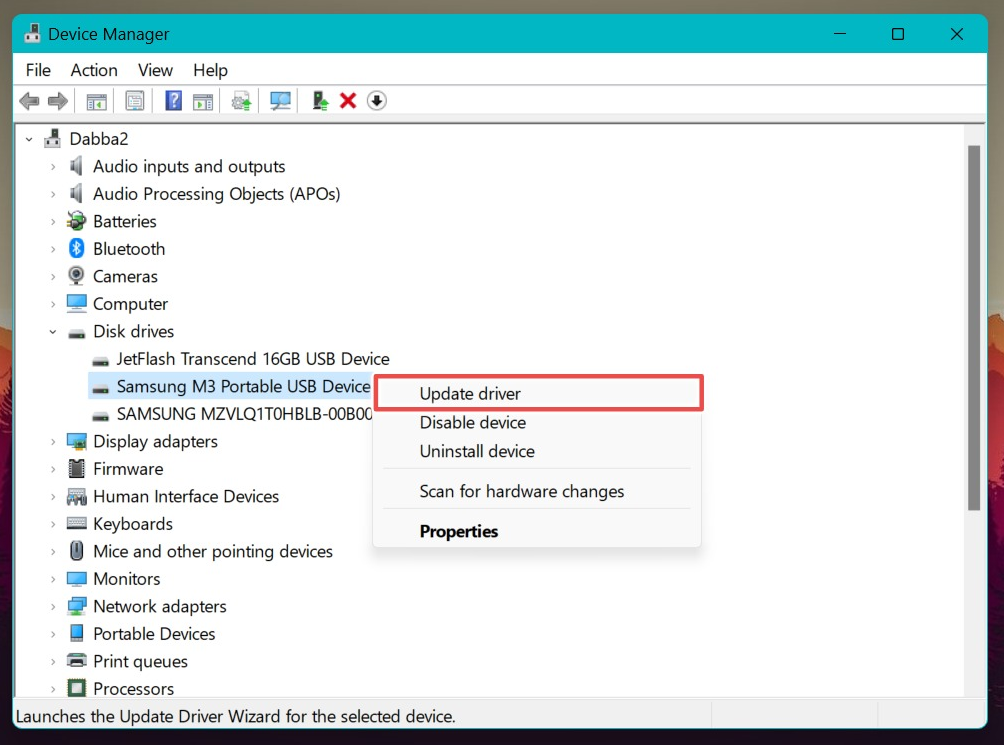
Sometimes, the issue isn’t with the drive itself, but with how it’s being… uh… entertained by your computer. This is where we might need to look at the driver. Drivers are like the translators that allow your computer and your hard drive to have a proper conversation. If the translator is speaking gibberish, things get messy. On Windows, you can access the Device Manager. Search for Device Manager in your Windows search bar. Once it’s open, find your external hard drive under categories like “Disk drives” or “Universal Serial Bus controllers”. Right-click on it and you’ll see options to “Update driver” or even “Uninstall device”. If you choose to uninstall, don’t freak out! Just disconnect the drive, restart your computer, and then plug the drive back in. Your computer will usually reinstall the driver automatically, giving it a fresh start. It’s like giving the translator a new script to read from.
Finally, a word of caution, dear reader. While these methods are designed to be non-destructive, it’s always a good idea to have a backup of your important data if possible. However, when you’re in a pinch and your drive is misbehaving, these steps are your first line of defense before resorting to the dreaded formatting, which, let’s be honest, feels like a digital divorce.
So, there you have it! A few fun, easy, and hopefully successful ways to coax your rebellious external hard drive back into the land of the living without wiping it clean. Go forth and conquer that digital stubbornness with a smile!