How To Erase A Usb Drive Completely

Imagine your trusty USB drive, that little stick of digital magic you carry around. It’s like a tiny superhero, holding all your important documents, hilarious photos, and maybe even that embarrassing karaoke performance. But what happens when it’s time for it to retire, or when you want to pass it on to a new adventurer?
Think of it like this: you wouldn't give away your diary without shredding its secrets, right? Your USB drive, in its own quiet way, is a bit like that. It holds digital whispers of your past adventures, and sometimes, those whispers need to be silenced for good.
Now, before you get all Bond-villain about it, erasing a USB drive is actually a pretty straightforward, and dare we say, therapeutic process. It’s like giving your drive a fresh start, a clean slate, ready for a whole new chapter of data-carrying glory.
![How to Erase USB Drive Completely? [Solved] - YouTube](https://i.ytimg.com/vi/fYc3TW3fxiw/maxresdefault.jpg)
Let’s talk about the “why” in a fun way. Maybe this drive was your loyal companion during a marathon project, storing endless drafts of that novel you’re definitely going to finish. Or perhaps it was the keeper of precious family recipes, passed down through generations.
And sometimes, you just want to make sure that embarrassing work presentation from 2017 is truly gone. Poof! Vanished into the digital ether. It’s about reclaiming your digital privacy, like putting a “Do Not Disturb” sign on your files.
Now, for the “how,” and don't worry, we're not going to dive into a swamp of confusing jargon. We're going to keep it light, breezy, and, well, easy! Think of it as a digital spa day for your USB drive.
First things first, you’ll need your computer. This is the trusty steed that will help you on your mission. Mac, Windows, Linux – they all have their own special ways of doing this, like different languages for the same beautiful song.
Let’s start with the folks who use Windows. It’s like navigating a friendly neighborhood. You’ll plug in your USB drive, and it will appear like a new friend at your digital doorstep.
You’ll then head over to “This PC” or “My Computer,” a place where all your digital belongings reside. Find your USB drive in the list. It might have a funny name, or a name you gave it in a moment of creative genius (or sleep deprivation).
Right-click on that little icon. It’s like tapping it on the shoulder and saying, “Hey there, time for a change!” A menu will pop up, filled with options.
Look for the word “Format.” This is the magic word, the key to unlocking your drive’s inner peace. Clicking on it is like opening a door to a room filled with exciting possibilities (and data deletion).
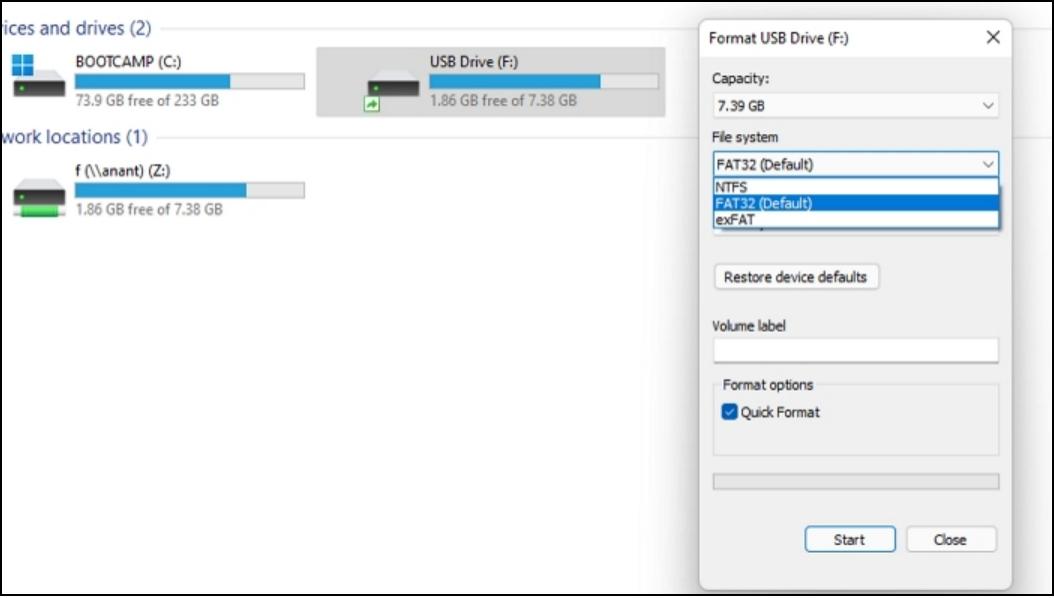
A new window will appear. Don’t be intimidated by the fancy terms; we’ll break them down simply. You’ll see options like “File system” and “Allocation unit size.” For most folks, the default settings are perfectly fine. Think of them as pre-set restaurant menus – usually, you can’t go wrong!
There's also a little checkbox that says “Quick Format.” Now, this is where things get interesting. A quick format is like a speedy tidy-up. It’s fast and efficient, perfect for when you just want to get the job done.
However, if you're truly aiming for a complete erasure, a “secure wipe,” then you might want to uncheck that little box. This is like doing a deep clean, making sure every single digital dust bunny is banished. It takes longer, but it’s thorough.
Think of a full format as meticulously polishing every surface, ensuring no trace of the past remains. A quick format is more like a brisk sweep, getting rid of the obvious.
Once you’re happy with your selections, hit the “Start” button. It’s the big red button of digital liberation! A warning will pop up, like a friendly reminder from your mom: “Are you sure you want to do this?”
And here’s the heartwarming part: this is your chance to be absolutely certain. Once it’s done, those files are truly gone. They’ve gone on a digital vacation, and they’re not coming back without some serious detective work (which we’re not doing today!).
So, go ahead and click “OK.” Watch as your computer works its magic. You might see a progress bar, like a tiny racecar moving across the screen. This is the sound of your USB drive shedding its old skin.
For the Apple aficionados, the Mac users, the process is just as delightful, just with a different scenic route. You’ll find your USB drive in the “Finder,” the digital hub of your Mac.
Look for the “Applications” folder, then find “Utilities.” Inside, you’ll discover a tool called “Disk Utility.” This is your Mac’s digital toolbox, where all the fixing and formatting happens.
Open Disk Utility. You’ll see a list of drives on the left. Select your USB drive from that list. It might be a bit more technical-looking, but don’t fret.
Click on the “Erase” button. Yes, it’s that simple! Again, a window will appear with options. You can choose the format you want, like APFS or Mac OS Extended. For most general purposes, these are excellent choices.
There’s also a “Security Options” button. This is where you can choose how thoroughly you want to erase your drive. Think of it as choosing between a light dusting or a deep scrub. The more secure options take longer but ensure maximum privacy.
Once you’ve made your choices, click “Erase.” Just like with Windows, your Mac will give you a gentle nudge, a digital tap on the shoulder, to confirm.
Hit “Erase” again, and watch the magic unfold. Your USB drive will be reborn, fresh and ready for new adventures. It’s like sending your old toys to a good home, knowing they’ll be loved and used again.
And there you have it! You’ve successfully erased your USB drive. It’s a small act, but it’s a powerful one. It’s about controlling your digital footprint, ensuring your data is safe and sound.
So, the next time you need to say goodbye to old data, remember this fun journey. It's not about deleting; it's about creating space for new memories, new projects, and new digital adventures. Your USB drive is ready to serve you well, time and time again.
It’s a little bit like decluttering your digital closet. You wouldn't keep old, moth-eaten sweaters, would you? Your USB drive deserves the same thoughtful consideration.
The feeling of a freshly formatted drive is surprisingly satisfying. It’s a small victory in the digital world, a clean slate ready for whatever you throw at it next. Maybe it’s time for some new photos, some updated work files, or even that karaoke performance you’ve been perfecting!
So go forth, and format with joy! Your USB drive thanks you for this digital refresh. It’s ready for its next mission, whatever that may be.