How To Delete A Whole Row In Excel
Hey there, spreadsheet whiz! Ever find yourself staring at your Excel sheet, realizing you've got a whole row that's just… not right? Maybe it’s a typo that spread like wildfire, a set of data you accidentally duplicated, or just a row that’s become as useful as a screen door on a submarine. Whatever the reason, you're here because you need to banish that entire row to the digital abyss. And guess what? It’s way easier than you think! Forget wrestling with individual cells or trying to copy and paste your way out of a mess. We're about to make this whole row deletion thing a breeze.
So, grab your favorite beverage (mine’s currently a questionable amount of coffee, shhh!), get comfy, and let’s dive into the wonderfully simple world of removing entire rows in Excel. We’ll cover a few ways to do it, from the super-quick mouse-and-click method to a slightly more… involved approach if you’re feeling adventurous. Think of me as your friendly Excel guide, here to make sure you don't accidentally delete your entire project. That would be a real bummer, wouldn't it?
The "Oops, I Clicked the Wrong Thing" Button: Quickest Way
Alright, let’s start with the absolute fastest, most straightforward way to get rid of a row. This is your go-to method for when you’ve spotted the offending row and want it gone yesterday. It’s so easy, you’ll wonder why you ever hesitated.
First things first, you need to select the row you want to delete. How do you do that? Easy peasy! Just find the row number on the far left side of your Excel sheet. See those numbers? 1, 2, 3, and so on? Click directly on the number of the row you want to say "adios" to. Poof! The entire row will be highlighted. It’s like giving it a big, bold, digital hug before you send it packing.
Once that row is nicely highlighted, it's time for the magic. Right-click anywhere within the highlighted row. A little menu will pop up – don't be scared, it's just Excel being helpful. Look for the option that says "Delete". Yep, that's the one!
Click "Delete," and poof! Your row will vanish. The rows below it will magically slide up to fill the gap. It’s like a synchronized swimming routine, but with data. And you’re the conductor. Pretty neat, huh?
What if I Need to Delete Multiple Rows?
Okay, so you’ve got more than one row that needs to go. Maybe you’ve got a whole section of junk data, or you’re trying to clean up a report that someone else (cough, cough) made a bit… creative with. No worries, we can handle that too!
Deleting multiple adjacent rows (that means rows that are right next to each other) is just as simple as deleting one. Select the first row you want to delete by clicking its number. Then, hold down the Shift key on your keyboard. While still holding Shift, click the number of the last row in your sequence that you want to delete. See how all the rows in between are now highlighted? You’ve just created a beautiful, contiguous block of rows ready for deletion.
Now, just like before, right-click on any of the highlighted row numbers. Select "Delete" from the pop-up menu. Boom! Multiple rows gone in a flash. It’s efficient. It’s clean. It’s… very satisfying.
What About Rows That Are Not Next to Each Other?
This is where things get a tiny bit more interesting, but still totally manageable. Let’s say you need to delete row 3, row 7, and row 10. They’re scattered like popcorn kernels in a movie theater. How do we tackle this?
This is where our trusty friend, the Ctrl key (or Command key on a Mac!), comes into play. Select the first row you want to delete by clicking its number. Now, hold down the Ctrl key. While holding Ctrl, click the number of the next row you want to delete. Keep holding Ctrl and click on any other rows you want to remove. You'll see each individual row number get highlighted, even if they're not touching.
Once you’ve selected all your scattered rows, release the Ctrl key. Now, right-click on any of the highlighted row numbers. You guessed it: select "Delete". And just like that, your randomly selected rows will disappear, leaving the rest of your data untouched. Isn't technology grand?
The "Right-Click is My Best Friend" Method (A Slightly Different Angle)
We’ve already touched on the right-click method, but let's reiterate it from the perspective of selecting data within the row. Sometimes, you might be working within a specific block of data and realize a whole row needs to go.
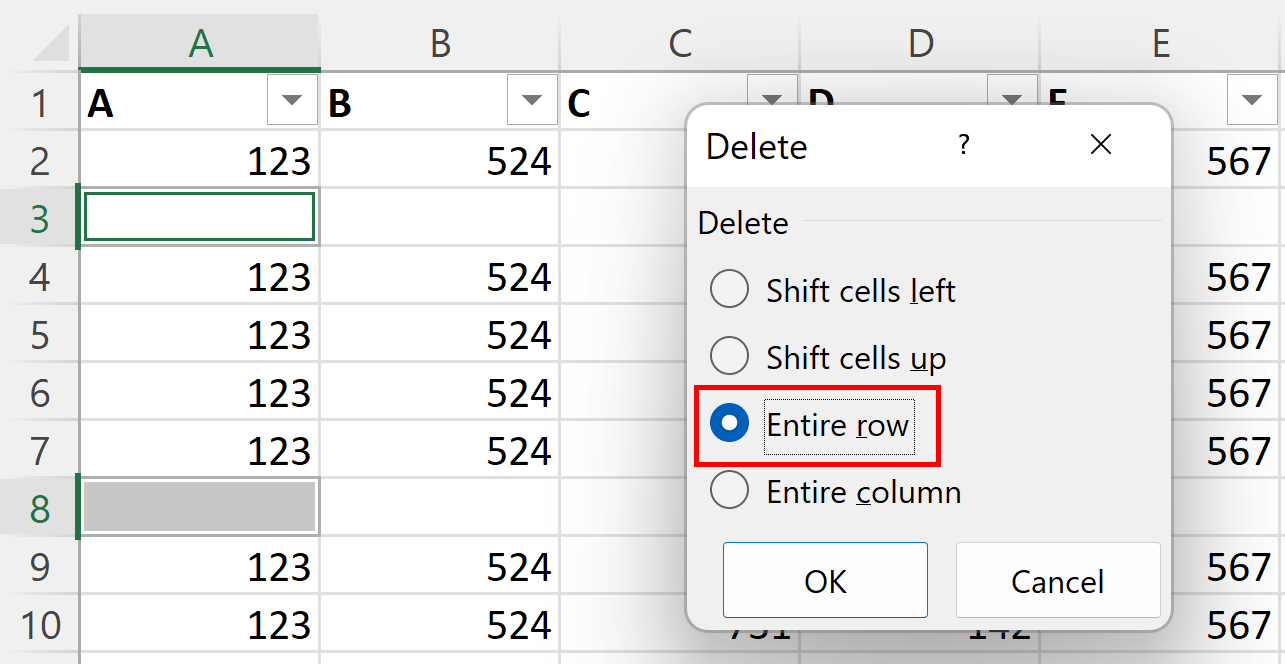
Instead of clicking the row number directly, you can select any cell within the row you want to delete. Just click on it. Then, right-click on that selected cell. The same pop-up menu will appear. You’ll see an option that says "Delete...". Go ahead and click that.
Now, Excel will ask you what you want to delete. You’ll see a couple of options, and this is where you need to be paying attention. You’ll see "Shift cells left" and "Shift cells up". If you want to delete the entire row, you need to choose "Shift cells up". This essentially tells Excel to remove the entire row and have everything below it move up. Think of it as removing the whole horizontal slice.
Click "OK," and your row will be gone. This method is super handy if you’re already deep in a selection and don’t want to navigate all the way to the row numbers. It’s like finding a shortcut when you’re already on the path.
The Ribbon Rescuer: Deleting Rows Using the Menu
For those who like to explore the fancy buttons at the top of Excel (we call it the "Ribbon," by the way), there's another way to achieve row deletion glory. This method is great for folks who prefer visual cues or when your right-click menu seems to be playing hide-and-seek.
First, you need to select the row or rows you want to delete. We’ve covered this: click the row number for a single row, use Shift for adjacent rows, or Ctrl for scattered rows. Make sure your selection is nice and highlighted.
Now, head up to the "Home" tab on the Ribbon. See that group of buttons that looks like it’s related to cells? It’s usually called the "Cells" group. In that group, you’ll find a button that says "Delete". Click on that little down arrow next to "Delete."
A drop-down menu will appear. And there it is, shining like a beacon of hope: "Delete Sheet Rows". Click on that. And voilà! Your selected rows will be deleted. It’s like giving Excel a polite, but firm, instruction from the main command center.
This method is especially useful if you're already working within the Ribbon and want to keep your workflow going without switching to the right-click context menu. It’s all about personal preference and what feels most natural to you.
A Little Word of Caution: The Undo Button is Your Superpower!
Now, before you go on a deleting spree, let me impart a little wisdom. Excel, bless its heart, has a magical feature called "Undo." It’s usually represented by a curved arrow pointing left, and it’s your absolute best friend. It's usually up in the Quick Access Toolbar, near the top left of your Excel window.
Did you just delete the wrong row? Did you accidentally delete way too many rows? Don’t panic! Immediately click that Undo button. Or, even better, use the keyboard shortcut: Ctrl + Z (or Command + Z on a Mac). With a single click or a quick key combo, whatever you just did will be magically reversed. It’s like having a time machine for your spreadsheets. Use it wisely, my friend, use it wisely!
Seriously, knowing how to undo is crucial. It takes the pressure off and allows you to experiment a bit more freely. So, when in doubt, remember the Undo button. It’s the safety net you never knew you needed.
Why Would You Even Want to Delete a Whole Row?
You might be thinking, "Why all the fuss about deleting rows? Can't I just ignore them?" Well, my curious friend, there are tons of reasons why you'd want a squeaky-clean, row-free existence in your spreadsheet:
- Cleaning Up Messy Data: This is the big one. Data entry isn't always perfect. You might have duplicate entries, placeholder rows, or rows that were just experiments gone wrong. Deleting them makes your data accurate and easier to analyze.
- Improving Readability: A spreadsheet crammed with unnecessary information is like trying to read a book with half the pages torn out. Removing empty or irrelevant rows makes your data much easier to scan and understand.
- Preparing for Analysis: When you’re ready to crunch numbers, filter data, or create charts, having extra junk rows can throw things off. Deleting them ensures your analysis is based on the real deal.
- Making Space: Sometimes, you just need to rearrange things. Deleting rows is the most efficient way to create space for new, important data.
- Reducing File Size: While not the biggest factor, sometimes overly large spreadsheets with tons of empty rows can hog up a bit of space. Deleting them can help, though it's usually minor.
- Presentation Perfection: If you’re sharing your spreadsheet with others, you want it to look polished and professional. Empty or irrelevant rows can make it look sloppy.
So, as you can see, deleting rows isn't just about tidiness; it's about making your data work for you, not against you. It’s about clarity, accuracy, and efficiency.
A Final Flourish of Row-Deletion Fun
And there you have it! You’ve now conquered the art of deleting entire rows in Excel. Whether you’re a click-and-drag enthusiast, a keyboard shortcut guru, or a ribbon explorer, you have the tools to banish unwanted rows with confidence. Remember, these little tricks are what make using Excel not just bearable, but actually quite powerful and, dare I say, fun!
So go forth, my spreadsheet samurai! Delete those rows with pride. Make your data shine. You’re not just managing numbers; you’re crafting clear, concise, and impactful information. And every time you successfully delete a row, take a moment to appreciate how much easier your life just got. You’ve got this, and the world of organized data awaits!