How Do You Put A Watermark In Excel
Hey there, spreadsheet enthusiasts and casual data wranglers! Ever found yourself staring at a beautifully crafted Excel sheet, maybe a budget masterpiece, a sales report that sings, or even a quirky personal inventory of your sock collection, and thought, "Man, this needs a little something extra"? Like, a signature touch? Or maybe you're sharing your genius work and want to make sure everyone knows who the brilliant mind behind it is? Well, my friends, allow me to introduce you to the wonderful world of watermarks in Excel.
Now, before you picture yourself wrestling with ink pads and delicate paper, let's chill. Putting a watermark in Excel is way less messy, and honestly, kind of fun! It’s like giving your spreadsheets a little digital tattoo. Or maybe a subtle wink from the creator.
So, what exactly is a watermark in this context? Think of it as a faded image or text that sits behind your actual data, visible but not obstructing. It’s that gentle "Draft" across a document, or your company logo peeking through. It's that secret handshake between you and your spreadsheet.
Why Would You Even Bother?
Good question! Beyond just bragging rights (though, let's be honest, who doesn't love a little recognition?), watermarks serve some pretty cool purposes.
For starters, they’re fantastic for indicating the status of your document. Is it a final, polished report ready to be presented to the board? Or is it still a work in progress, a rough draft that might undergo a few more tweaks? A "Draft" watermark can save you from awkward conversations where someone uses outdated figures. It’s like putting a "Wet Paint" sign on your digital masterpiece.
Then there’s the whole branding thing. If you're regularly churning out spreadsheets for clients or within a larger organization, a logo watermark can be a subtle but effective way to reinforce your identity. It’s not just a spreadsheet; it’s your spreadsheet. It adds a touch of professionalism, making it feel a bit more official, a bit more "this means business." Think of it like the discreet designer label on a swanky handbag – it’s there, it’s recognizable, and it adds value.
And let's not forget the protection angle, though it's not foolproof. If you're sharing sensitive information, a watermark can act as a deterrent against unauthorized copying or distribution. It's like shouting, "Hey, I made this, and I know it!" It might not stop a determined pirate, but for most casual offenders, it's enough of a reminder.
Alright, Enough Chit-Chat, How Do We Do It?
Okay, okay, you're eager to get your hands dirty – or, well, your mouse clicked. The process is surprisingly straightforward, and Excel makes it pretty user-friendly. We’re going to be diving into the magical land of the “Page Layout” tab.
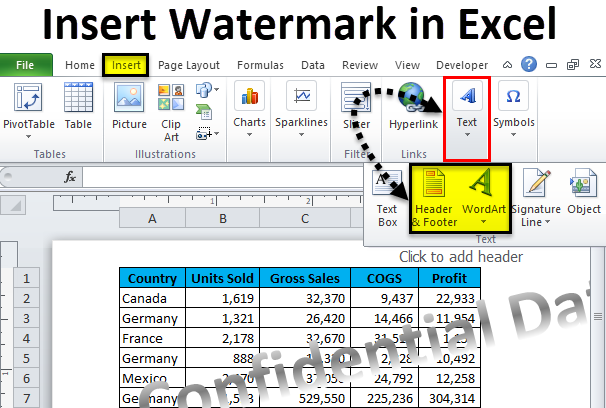
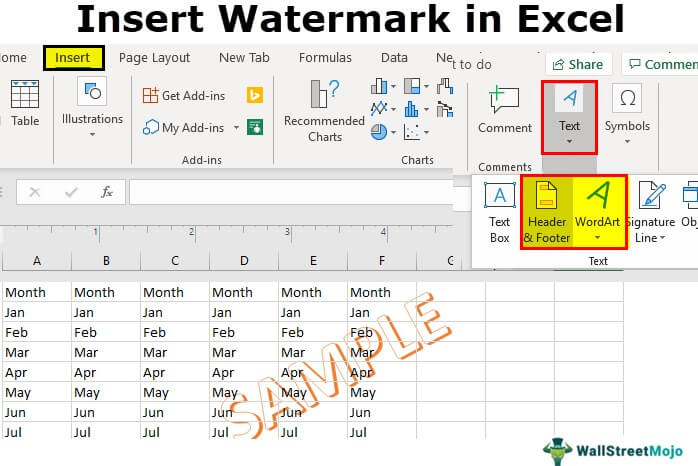
First things first, open up your Excel workbook. Got it? Great! Now, look for the tab that says “Page Layout” at the top. Click on that bad boy. See all those options? We're looking for something called “Watermark.” If you don't see it immediately, don't panic. Sometimes it’s tucked away a little. On some versions, you might need to go to “Header & Footer” first, which is also usually in the Page Layout tab or the Insert tab.
Let’s assume you found it. Click on “Watermark.” You'll likely see a few options pop up, usually pre-set choices like "DRAFT," "CONFIDENTIAL," or "SAMPLE." These are your quick and easy options. If one of those fits the bill, you can just click it, and poof – watermark magic happens!
But What If I Want My Own Special Sauce?
Ah, the desire for customization! I feel you. Sometimes, the pre-set options are like wearing off-the-rack clothes – they’re fine, but they don't have your flair. Thankfully, Excel lets you create your own custom watermarks.
So, back to the “Page Layout” tab. When you click “Watermark,” you should see an option for “Custom Watermark…” (or something similar). Click on that, and a new window will pop up, your gateway to watermark wonderland!
Here, you have two main choices: Picture watermark or Text watermark.
The Picture Perfect Watermark
So, you want your company logo? Or maybe a cool graphic you designed? This is where you’ll do it.
Select “Picture watermark.” You’ll then see a button that says “Select Picture…” Click that. This will open up your computer's file explorer, allowing you to browse for the image you want to use. Find your perfect picture, select it, and hit “Insert.”
Now, you have some options to play with. The “Scale” option lets you adjust the size of your watermark. You can choose from percentages like 50%, 100%, or even "Auto" if you want Excel to take a guess. You might need to play around with this a bit to get it just right.
The “Washout” option is super important. If you leave it unchecked, your logo might be a bit too… well, present. It could make your data hard to read. Checking “Washout” makes the image lighter and more transparent, so it acts more like a background element. It’s like turning down the volume on a song so you can still hear the lyrics – the data!
Once you're happy with the preview, hit “OK,” and bam! Your picture watermark will grace your spreadsheet.
The Texty-Texty Delight
Maybe you just want a simple word or phrase. "Confidential," "For Internal Use Only," or perhaps a cheeky "My Awesome Spreadsheet." Text watermarks are your go-to for this.
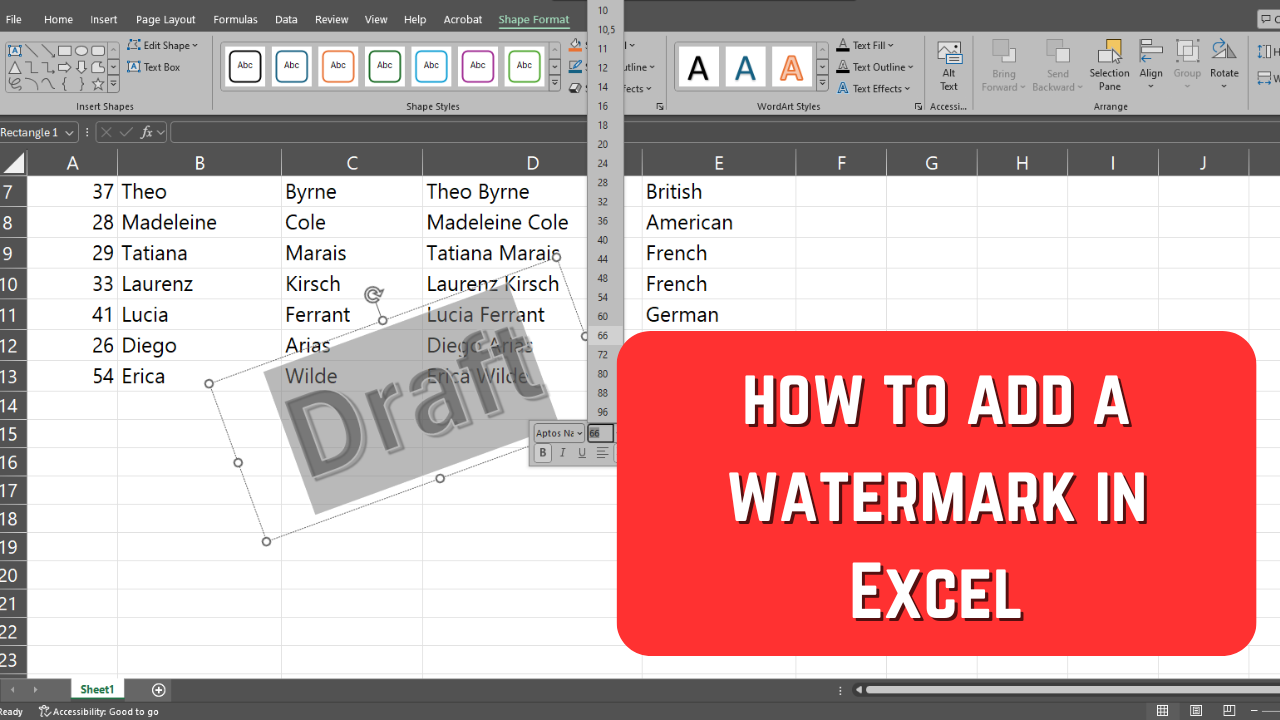
Select “Text watermark.” This is where you get to be the wordsmith. In the “Text:” box, type whatever you want your watermark to say.
Then comes the fun part: customization! You can choose the “Font” from a whole list of options, just like in any other document. You can adjust the “Size,” and you can even change the “Color.”
The “Layout” option is also key here. You can choose to have your text go “Diagonal” (that’s the classic slanted look) or “Horizontal” (straight across).
Just like with pictures, there's often a “Semitransparent” option (similar to "Washout"). Again, this is crucial for ensuring your actual data remains readable. You want your watermark to be a whisper, not a shout.
Once you’ve crafted your perfect text watermark, hit “OK.”
A Few Little Tips and Tricks
So, you've watermarked your sheet. High five! But here are a couple of things to keep in mind:
Watermarks are printed on every page. So, if you have a multi-page report, your watermark will appear on each and every one. This is usually what you want, but just be aware of it.
Removing a watermark is just as easy. Head back to “Page Layout” > “Watermark” and select “Remove Watermark.” Simple as that. No special keys or incantations required.
Be mindful of readability. The golden rule of watermarking is that your actual data must always be the star. If your watermark is making it hard for someone to read your numbers or text, it’s doing more harm than good. Experiment with the transparency and size until you strike the perfect balance. It’s a bit like finding the right lighting for a photo – you want it to enhance, not obscure.
And there you have it! You've officially unlocked the secret of adding watermarks to your Excel spreadsheets. Whether you're adding a professional touch, indicating a document's status, or just having a bit of fun, it’s a simple feature that can make your spreadsheets feel a little more personal and a lot more impactful. So go forth, watermark with pride, and let your digital creations shine!