How Do I Mail Merge From Excel To Labels

Ever stare at a pile of envelopes, a stack of name tags, or a bunch of gift tags, and think, "There has to be a better way than writing out every single one by hand?" Yeah, me too. It feels like a task from the dark ages, right? Like churning butter or spinning your own wool. But what if I told you there’s a way to harness the power of your trusty spreadsheet, that place where you keep all your lists and numbers, and magically turn it into perfectly printed labels? Sounds pretty cool, doesn't it?
We're talking about something called mail merge. And honestly, it's not some super-secret tech wizardry. It's more like a clever trick that your computer can do, and once you know how, it'll feel like you've unlocked a superpower. Imagine this: you've got a guest list for a party, a class roster, or maybe even addresses for holiday cards. All those names and addresses are sitting pretty in an Excel file. Wouldn't it be awesome if you could just tell your computer, "Hey, take these names and addresses and put them onto these label sheets"? Well, guess what? You totally can.
So, how do we actually do this magical mail merge from Excel to labels? It’s not as complicated as it might sound. Think of it like assembling a super-awesome sandwich. You've got your bread (that's your label template), and you've got all your delicious fillings (that's the information from your Excel sheet). Mail merge is basically the process of spreading those fillings evenly and perfectly onto every slice of bread. Pretty neat, huh?
Getting Your Ducks in a Row (Your Excel Data)
Before we even think about printing, we need to make sure our Excel sheet is ready for its starring role. This is like prepping your ingredients before you start cooking. If your ingredients are all over the place, your meal (or your labels) might not turn out so great.
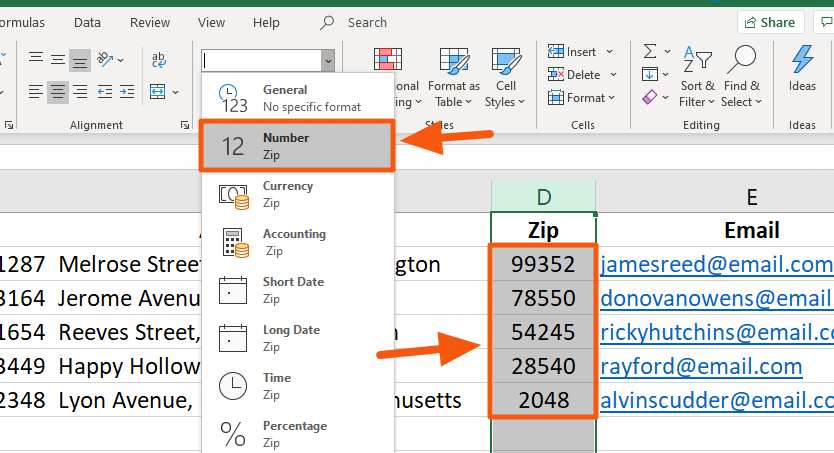
First things first, make sure your data is organized. Each column should represent a specific piece of information. So, you might have a column for "First Name," another for "Last Name," one for "Address Line 1," and so on. This is super important. Think of it as giving each piece of information a clear label so the computer knows exactly what it is. No mixing up phone numbers with street names!
Also, check for any stray bits of information. Empty cells? Weird characters? Those can sometimes throw a wrench in the works. A little bit of cleanup now will save you a headache later. It's like making sure there are no rogue peas in your mashed potatoes – nobody wants that!
One of the most common things people do is combine first and last names into one column. While that's fine for some things, for mail merge, it's often easier if they're separate. That way, you can address your label as "Dear John" or "Dear Mr. Smith" depending on your preference. Just a little tip from your friendly neighborhood mail merge guru!
The Star of the Show: Microsoft Word
Now, you might be thinking, "But I have Excel! Why do I need Word?" Well, Excel is fantastic for organizing data, but Word is where the magic of creating documents and laying out text really happens. It's like Excel is the recipe book, and Word is the kitchen where you actually bake the cake.
Open up Microsoft Word. We’re going to start a new, blank document. Don't worry about typing anything yet. We're just setting the stage.
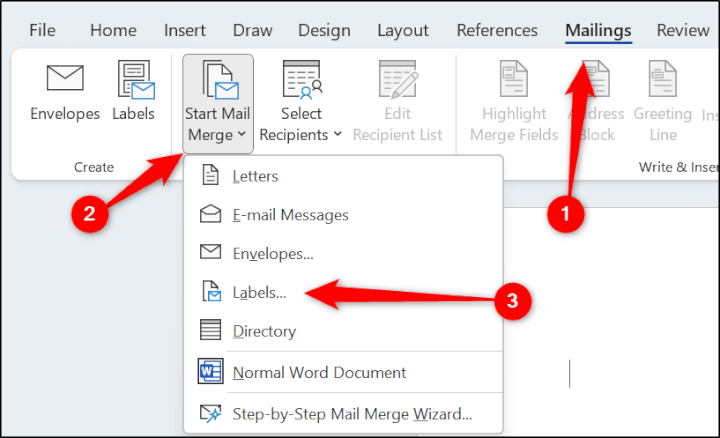
Next, we need to tell Word we're going to be printing labels. Head over to the Mailings tab. See that? It’s like a hidden door to all the mail merge goodies. Click on that, and then look for Start Mail Merge. When you click that, you’ll see an option for Labels. Select that!
Now, Word is going to ask you what kind of labels you're using. This is where you get to be a bit of a detective. Usually, there's a brand name and then a product number. You know, like Avery or some other label company. If you have the packaging for your labels, it's a good time to check it out. If you don't, don't panic! Most standard label sizes are pretty much the same. You can usually pick a generic option that will work just fine.
Once you’ve selected your label type, click OK. You'll see your blank document transform. It might look a little weird, with all these grey lines. Those grey lines are actually the outlines of your individual labels. Pretty neat, right? It's like seeing the blueprint for your label masterpiece.
Connecting the Dots: Linking Excel to Word
This is where the real magic happens! We're going to connect our organized Excel data to our label template in Word.
Still in the Mailings tab, look for Select Recipients. Click on that, and then choose Use an Existing List…. This is the moment of truth!
A window will pop up, asking you to find your Excel file. Navigate to where you saved your Excel spreadsheet and select it. Click Open.
Now, Word might ask you which worksheet contains your data. If you only have one sheet in your Excel file, it’s usually pretty smart and will select it automatically. If you have multiple sheets, just choose the one with your names and addresses. You might also see a checkbox for "First row of data contains column headers." Make sure that's checked if the first row of your Excel sheet has your column titles (like "First Name," "Last Name," etc.). This tells Word to use those titles as the labels for your data fields.
Click OK. Ta-da! You've now connected your Excel data to your Word document. It's like plugging in your phone charger – you're ready to power up!
Inserting Your Fields: The Personal Touch
We're almost there! Now we need to tell Word where to put all that information from your Excel sheet onto each label. This is where we use something called merge fields.
Go back to the Mailings tab. You'll see a button that says Insert Merge Field. Click on that.
A dropdown menu will appear, showing you all the column headers from your Excel file. This is so cool! Let’s start with the first label. Click on the first label area in your Word document. Then, click Insert Merge Field and choose "First Name." You'll see something like <
Now, hit the spacebar. Then, click Insert Merge Field again and choose "Last Name." So now you have <
On the next line of the label, click, go to Insert Merge Field and choose "Address Line 1." Then, on the line after that, insert "Address Line 2" (if you have it), and then finally, your "City," "State," and "Zip Code." You can add commas and spaces where they belong, just like you would when writing an address normally.
It might look a little messy with all those angle brackets and underscores, but don't worry. That's just the computer's way of knowing what information goes where. Think of it as the secret code to unlocking personalized labels.
Seeing is Believing: Previewing Your Masterpiece
Before we print a single label, we have to preview. This is the most important step, like tasting your soup before serving it to guests.
On the Mailings tab, you'll find the Preview Results button. Click on that. And… wow! Your generic label should now be filled with the information from the first row of your Excel spreadsheet. It's like magic! You can then use the little arrows next to "Preview Results" to cycle through all your addresses and see them on the labels.
Are the names spelled correctly? Is the address formatting right? Is everything looking good? This is your chance to catch any little hiccups before they go to print. If something looks off, you can go back, adjust the merge fields, or even go back to your Excel sheet to fix the data.
The Grand Finale: Printing Your Labels
Once you're happy with the preview, it's time to print! Head back to the Mailings tab, and click on Finish & Merge. You'll have a few options here, but for printing labels, you'll want to select Edit Individual Documents…. This will create a new Word document that contains all your labels, one for each person on your list. This is a great way to have a final look at everything before it hits the printer.
Alternatively, you can go directly to Print Documents…. Word will ask you if you want to print all records, the current record, or a range. Choose what works best for you.
And then… hit that print button! Load your label sheets into your printer, making sure they’re loaded correctly (check your printer’s manual if you’re unsure). And there you have it! Perfectly printed labels, all done without you having to write a single thing. How awesome is that?
Mail merge from Excel to labels is such a time-saver, and honestly, it's just really satisfying to see your data come to life like this. Whether you're sending out invitations, organizing files, or just want to impress your friends with your tech-savvy skills, this is a trick worth knowing. So next time you're facing a mountain of addresses, remember this little bit of magic. Happy labeling!