How Do I Download Photos From Icloud To Mac

Ever felt that delightful pang of nostalgia when scrolling through your iPhone's camera roll, only to realize that your most treasured memories are living in the ethereal cloud of iCloud? It's a common modern predicament, isn't it? You've captured that perfect sunset, that hilarious pet antic, or that milestone family moment, and now you're thinking, "How do I get these beauties onto my trusty Mac?" Fear not, fellow digital curator! This isn't some arcane tech wizardry; it's a straightforward process, designed to keep your precious visual stories accessible and ready for rediscovery.
Think of iCloud as your personal, albeit very secure, digital attic for photos. It's a brilliant system that keeps your pictures and videos synchronized across all your Apple devices. But sometimes, you want those tangible digital treasures offline, perhaps to edit them with more robust software, to back them up in a more permanent way, or simply to enjoy them on a bigger screen without a constant internet connection. Whatever your motivation, downloading photos from iCloud to your Mac is a breeze, and we're about to walk through it with the kind of calm confidence you'd expect when choosing the perfect filter for your latte art.
The iCloud Photo Library: Your Digital Memory Bank
Before we dive into the "how," let's have a little chat about the "what." iCloud Photo Library (now often referred to as simply "Photos" in iCloud settings) is the magic behind the curtain. When you have this feature enabled on your iPhone, every photo and video you take is automatically uploaded to iCloud. Then, if you have it enabled on your Mac, it mirrors your iCloud library. This means your photos are already on your Mac, if you're using the Photos app and have iCloud Photo Library turned on there. It's like having a photographic twin living on both devices!
But what if you're not using the Photos app on your Mac, or you only want specific photos? Or perhaps you've just updated your iPhone and want to ensure those brand-new shots make their way over? That's where the direct download methods come in. We're talking about pulling those gems from the cloud and placing them safely on your hard drive, where you can wrangle them as you please.
Method 1: The Photos App - Your Built-in Best Friend
If you're an Apple devotee, chances are you're already using the Photos app on your Mac. This is, hands down, the most seamless way to manage your iCloud photos. The beauty of iCloud Photo Library is that it syncs. So, if you've enabled it on your Mac, your photos should be there already. But let's ensure everything is up-to-date and explore how to get them if they aren't.
Step 1: Check Your Settings (The Crucial First Step)
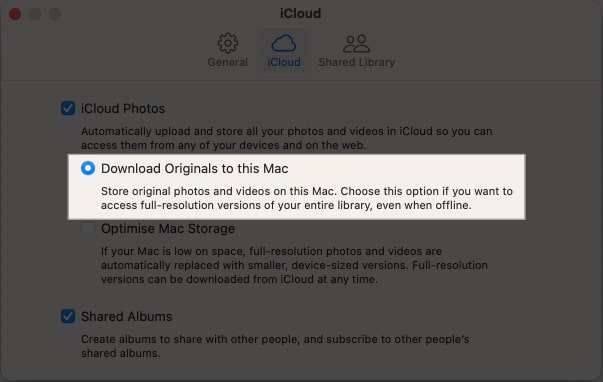
Open the Photos app on your Mac. In the menu bar, go to Photos > Preferences. Click on the iCloud tab. Ensure that iCloud Photos (or iCloud Photo Library) is checked. If it’s not, select it. You’ll then see two options:
- Download Originals to this Mac: This is your golden ticket for having full-resolution copies of all your photos and videos directly on your Mac's hard drive. It’s perfect if you have ample storage and want immediate access to your entire library. Think of it as creating a perfectly curated physical album of every single snapshot you've ever taken.
- Optimize Mac Storage: This option keeps smaller, device-sized versions of your photos on your Mac to save space. The full-resolution originals are stored in iCloud. When you want to view or edit a photo, it will download the original automatically. This is a lifesaver if your Mac's storage is feeling a bit cramped, like trying to fit your entire wardrobe into a carry-on.
Choose the option that best suits your storage situation and workflow. If you select "Download Originals to this Mac," give it some time, especially if you have a vast photo library. It's like watching your digital collection slowly populate your hard drive, a gentle stream of memories flowing in.
Step 2: Waiting for the Magic (Patience is a Virtue, Especially with Gigabytes)
Once iCloud Photos is enabled, and especially if you choose to download originals, your Mac will start downloading everything from iCloud. You'll see a progress indicator at the bottom of the Photos app window. This can take a while, depending on the size of your library and your internet speed. Think of it as a digital migration, a grand transfer of your visual legacy.
Fun Fact: The average smartphone user takes around 1,000 photos per year! Imagine that many memories needing to be downloaded – it's a significant undertaking!
Step 3: Exporting Specific Photos (When You Don't Need the Whole Attic)
Sometimes, you only want a few select shots. Maybe you’re creating a presentation, sending a specific photo to a friend via email (beyond the limitations of iMessage), or just want to save a particular memory to a dedicated folder. This is where exporting comes in.
In the Photos app, select the photos or videos you want to download. You can select multiple by holding down the Command key while clicking. Then, go to File > Export > Export [number] Photos.... You'll be presented with export options:
- Photo Kind: Choose Original if you want the exact file as it was taken, or select a format like JPEG or TIFF. For most purposes, JPEG is perfectly fine and offers good quality with manageable file sizes.
- File Naming: You can choose how the exported files are named. "Sequential" is great for keeping things organized if you're exporting a batch.
- JPEG Quality: If you choose JPEG, you can decide on the quality. Maximum quality is usually the best bet for preserving detail.
- Include Location Information (IPTC): This is a neat feature that embeds metadata like where and when the photo was taken into the file itself.
Click Export and choose the folder on your Mac where you want to save them. Voilà! Your chosen memories are now safely on your hard drive.
Method 2: iCloud.com - For a Quick Grab-and-Go
What if you’re not on your Mac, or you want a quick, no-fuss download of just a few photos without involving the entire Photos app ecosystem? Enter iCloud.com. This web interface is your gateway to your iCloud data from any computer, anywhere in the world.
Step 1: Log In to iCloud.com
Open a web browser on your Mac and navigate to www.icloud.com. Sign in with your Apple ID and password. You might be prompted for two-factor authentication, which is a good thing! It’s like having an extra lock on your digital front door.
Step 2: Access the Photos Section
Once logged in, you’ll see icons for various iCloud services. Click on the Photos icon. This will open your iCloud Photo Library in a web browser format. It might look slightly different from the Photos app, but all your albums and individual photos will be there.
Step 3: Select and Download
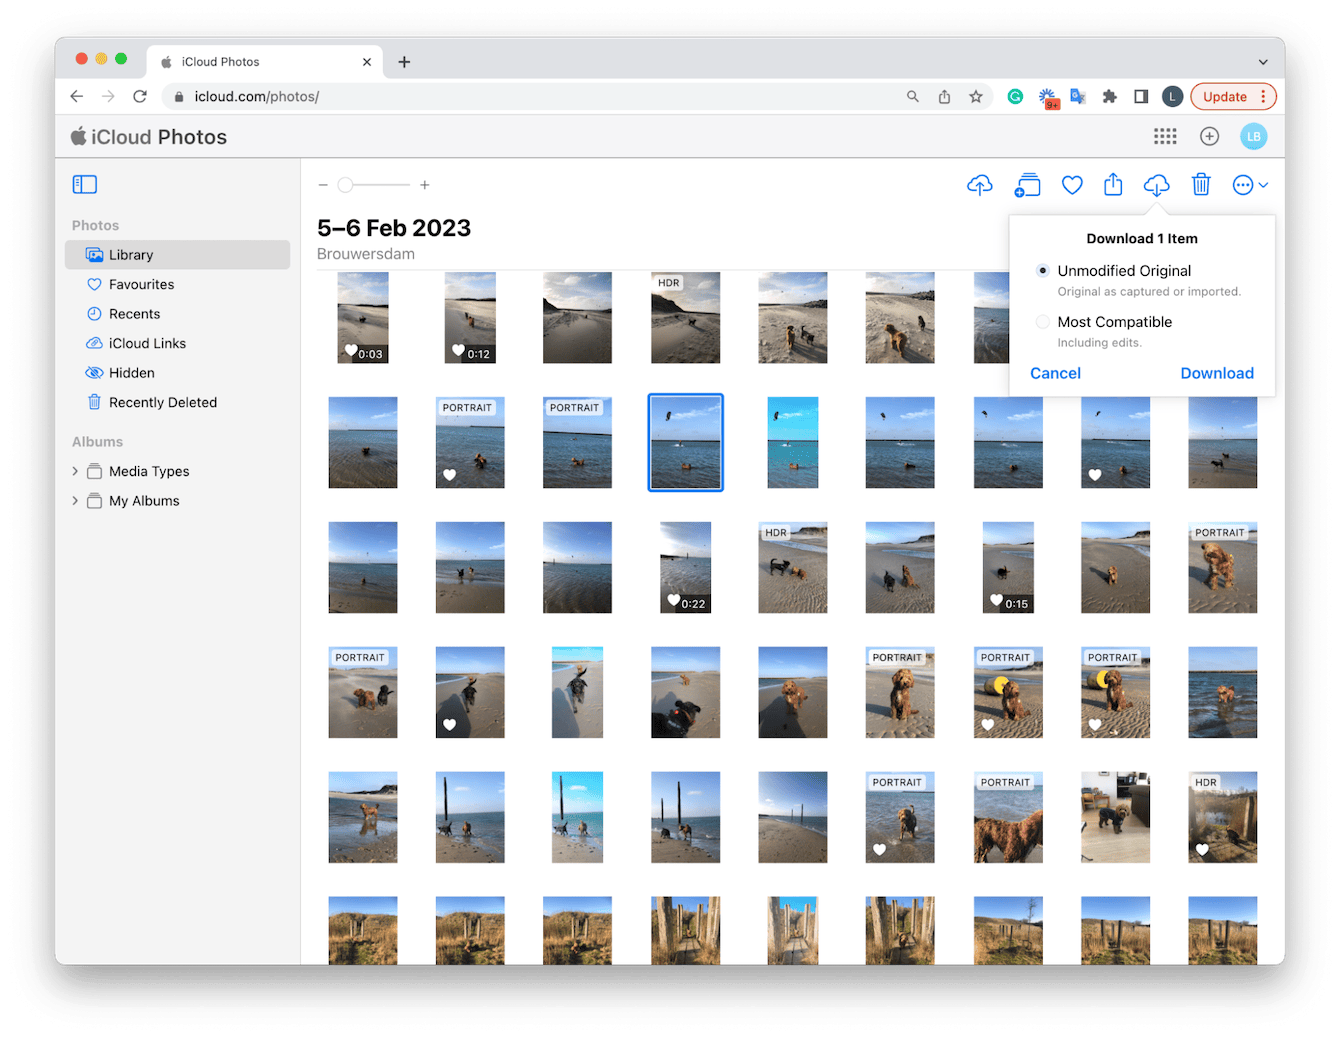
Browse through your photos. To select multiple photos, click the first one, then hold down the Shift key and click the last one in a range, or hold down the Command key and click on individual photos you want. Once you’ve made your selections, you’ll see a download icon (usually a cloud with a downward-pointing arrow) in the top right corner of the screen. Click it!
Your browser will then prompt you to save the photos. They will typically be downloaded as a .zip file, especially if you select more than one. Unzip the file, and there you have it – your selected memories ready to be organized on your Mac. This method is super convenient for grabbing a few specific shots without needing to wait for a full sync or export process within the Photos app.
Cultural Reference: Think of iCloud.com as the digital equivalent of ordering takeout from your favorite restaurant when you don't feel like cooking. It’s efficient, convenient, and gets you what you want quickly.
Method 3: iCloud Drive and the "Desktop & Documents" Folders (A Sneaky but Effective Route)
This method is less about directly downloading all your photos in one go and more about leveraging iCloud Drive's sync capabilities, particularly if you've enabled "Desktop & Documents" sync. If you sync these folders via iCloud Drive, and you happen to have a folder of photos that you manually saved to your Desktop or Documents folder on your iPhone (and which subsequently synced to your Mac via iCloud Drive), then they'll appear on your Mac automatically.
Step 1: Enable iCloud Drive Sync (if not already)
On your iPhone, go to Settings > [Your Name] > iCloud > iCloud Drive and make sure it's toggled on. Also, under your Apple ID settings on your Mac, ensure that iCloud Drive is checked. Crucially, under iCloud Drive options on your Mac, make sure "Desktop & Documents Folders" is selected. This tells iCloud to sync the contents of these two folders from your Mac to iCloud, and vice-versa.
Step 2: Organize Your Photos on Your iPhone
If you want to use this method, you would typically create a folder for your photos on your iPhone's Files app, perhaps named "Vacation Pics 2023." Then, you would save those photos into that folder. If that folder resides within your iCloud Drive's structure (or is saved to your Desktop/Documents folder on iPhone, which then syncs to your Mac), it will appear on your Mac.
Step 3: Access on Your Mac
Open Finder on your Mac. You’ll see iCloud Drive in the sidebar. Navigate through your folders, and any photos you’ve saved this way will be there. You can then copy and paste them to any location on your Mac. This is particularly useful if you’re already using iCloud Drive for other file management and want to keep your photos integrated into that system.
Pro Tip: While this method is great for general file syncing, it’s not ideal for managing your entire camera roll from your iPhone. The Photos app is specifically designed for that. Think of this as a more manual, file-organization approach.
Tips for a Smooth Sailing Experience
Keep Your Software Updated: Just like keeping your fridge stocked with fresh produce, keeping your macOS and iOS software up-to-date ensures that iCloud and the Photos app function at their best. Updates often include bug fixes and performance improvements that can make syncing and downloading a lot smoother.
Check Your Storage: Before you commit to downloading your entire iCloud Photo Library to your Mac, take a moment to check your Mac's storage. Go to Apple menu > About This Mac > Storage. If you’re running low on space, consider using the "Optimize Mac Storage" option in Photos preferences or selectively downloading photos via iCloud.com or exporting from the Photos app.
Internet Connection is Key: Downloading large amounts of data requires a stable and reasonably fast internet connection. If your Wi-Fi is spotty, you might experience slow downloads or interruptions. Perhaps consider downloading during off-peak hours or when you have a particularly robust connection. It’s like choosing the best time to stream your favorite show without buffering!
Organize as You Go: Don't wait until you have thousands of photos scattered across your Mac to start organizing. As you download or sync photos, create folders by date, event, or theme. This makes finding specific memories later a joy, rather than a scavenger hunt.
Backup, Backup, Backup: While iCloud is a fantastic service, it's always wise to have a separate backup of your precious photos. Consider using an external hard drive with Time Machine or another cloud backup service. This is your ultimate digital safety net, ensuring your memories are safe even if the unthinkable happens.
Fun Fact: The first digital camera was invented in 1975, but it wasn't until the late 1990s and early 2000s that digital photography truly took off, paving the way for services like iCloud Photo Library. Imagine life before instant photo sharing!
A Moment of Reflection
In our fast-paced, digital world, our photos are more than just pixels on a screen; they are tangible threads woven into the fabric of our lives. They are storytellers, reminding us of laughter shared, adventures embarked upon, and the quiet moments that shape us. Downloading your photos from iCloud to your Mac isn't just a technical task; it's an act of preserving your personal history, ensuring that these visual echoes of your journey are readily accessible, ready to be revisited, shared, and cherished. It's about taking a moment to connect with your past, to appreciate the journey, and to know that those precious memories are safely in your hands, ready for whatever chapter comes next.