Does The Toilet Flange Go On Top Of The Tile

Okay, so picture this: it’s Saturday morning. The sun is just starting to peek through the blinds, promising a day of… well, probably chores. And what chore is staring me down? The bathroom renovation. Specifically, the toilet installation. I’d wrestled the old beast out, cleaned up the questionable remnants (we don’t need to go into detail here, trust me), and now it was time for the moment of truth: the flange. I’d seen the YouTube tutorials, I’d read the forum posts, and I was ready. Or so I thought.
I carefully placed the shiny new flange over the drainpipe, admiring its sturdy plastic (or was it metal? Honestly, it looked like something out of a sci-fi movie). Then, I looked at the gorgeous new tile I’d just painstakingly laid. And a little voice, the same one that whispers "Did you really need that third slice of pizza?", started to nag. “Hold up,” it said. “Does this flange thing… does it go on top of the tile? Or under it?” My heart sank a little. This was not the part I’d anticipated being a philosophical quandary.
And that, my friends, is how I found myself staring at a toilet flange and a perfectly good tile floor, wondering if I was about to commit a cardinal sin of plumbing. It’s a question that pops up more often than you’d think, and the answer, like most things in DIY, isn’t always a simple yes or no. But let’s dive in, shall we? Because understanding this little piece of plumbing magic is actually pretty crucial for a leak-free, wobble-free toilet experience. And trust me, nobody wants a wobbly toilet.
:max_bytes(150000):strip_icc()/setting-a-toilet-2719046-01-0db328a65c274dc88231545451825328.jpeg)
The Great Toilet Flange Debate: Tile Above or Below?
So, the core of our mystery: does the toilet flange go on top of the tile? The short, often frustrating answer is: it usually goes below the finished floor. But, and this is a big but (pun absolutely intended), there are situations and specific flange types where it can sit on top. It’s a bit like asking if a ketchup bottle should be stored in the fridge or on the counter. Depends on the ketchup, right? (Okay, bad analogy, but you get the gist).
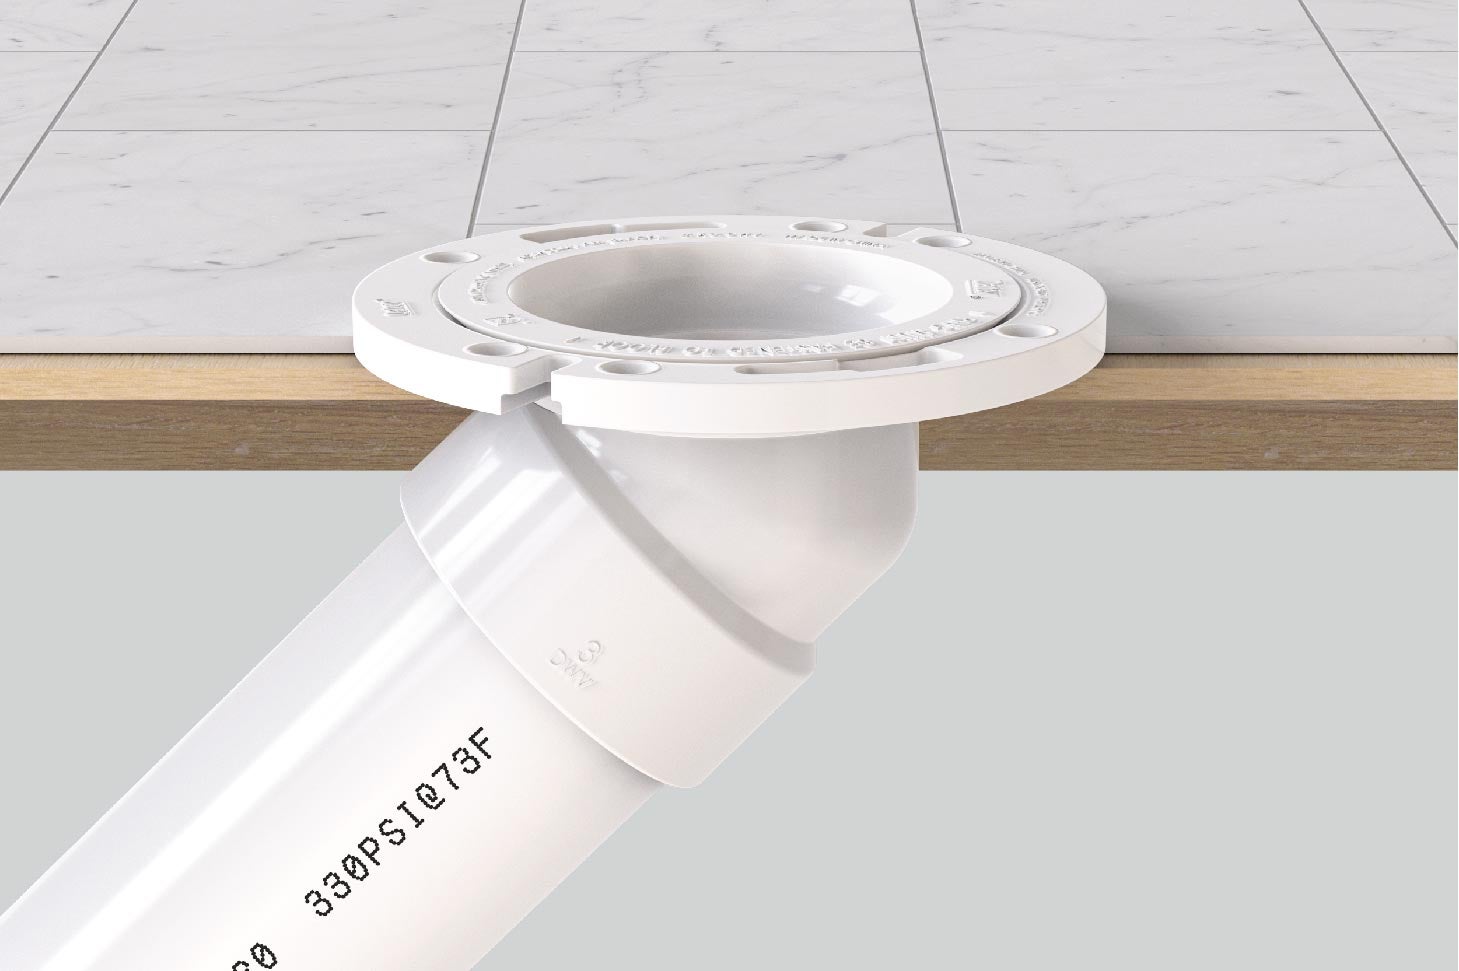
Let’s break down the “why” behind the preferred method. The toilet flange, also known as a closet flange or toilet horn, is essentially the connector between your toilet and the drainpipe in the floor. Its main job is to provide a watertight seal and to secure the toilet to the floor. It also has those handy little bolt holes that the toilet sits on, keeping it firmly in place.
The ideal scenario, the one that makes most plumbers and experienced DIYers nod approvingly, is when the flange sits flush with the finished floor. This means that once your tile, vinyl, linoleum, or whatever your chosen flooring is, is installed, the top surface of the flange should be perfectly level with the surface of that flooring. This allows the toilet’s wax ring (another crucial player in the leak-prevention game!) to create a solid, even seal.
Think about it: if the flange is too low, and the tile sits on top of it, you’ve got a potential gap. That gap can lead to a weak seal with the wax ring, which, as you can probably guess, means leaks. And leaks are the enemy of a happy bathroom. Nobody wants a little puddle forming around their toilet. It’s just… not a good look. Or smell. Or feeling.
The “Standard” Installation: Flange Below the Tile
In the vast majority of cases, when you're installing a new toilet, you’ll be dealing with a flange that is intended to be installed before the finished flooring goes down. This is because you need to secure the flange directly to the subfloor or the joists below. It’s meant to be a solid anchor point.
So, you've got your drainpipe sticking up from the subfloor. You’ll then attach the flange to the subfloor, ensuring that its lip (the part that will eventually sit against the wax ring) is at the correct height. This correct height is the key. It should be just slightly above the subfloor, leaving enough room for your tile and any underlayment that might be used.
Here's where it gets a little nuanced. Different flooring materials have different thicknesses. A thin sheet of vinyl might not raise the floor much, while a thick, natural stone tile could add a significant amount of height. This is why the flange height is so critical. If you have a very thick tile, you might need to use spacers or a taller flange to ensure that when the tile is laid, the top of the flange is still flush with the tile’s surface.
Imagine the drainpipe as a little volcano. The flange is the rim of that volcano. The tile is the landscape surrounding it. You want the rim of the volcano to be level with the surrounding landscape, so the lava (or, you know, water) flows out smoothly and doesn’t pool up around the base. If the tile is higher than the rim, you’ve got a problem. If the tile is lower, you also have a problem.
This is where those helpful little waxless seals come in handy. Some modern flange systems offer waxless seals that can be more forgiving of slight height differences. However, even with these, aiming for that flush surface is still the gold standard for a reliable seal.
When the Flange Might Sit On Top (And Why You Should Be Cautious)
Now, for the exception to the rule. There are certain types of flanges, often called “surface mount” or “repair” flanges, that are specifically designed to be installed after the flooring is in place. These are usually a good option if you’re dealing with an existing bathroom where the original flange is damaged or too low.
These surface-mount flanges typically have a wider base or an adjustable collar that allows them to sit directly on top of the tile. They often incorporate a gasket or a sealing mechanism that creates a barrier between the flange and the flooring. This is a clever solution for retrofitting and avoiding a major demolition job.
However, even with these, there's a caveat. You need to ensure that the toilet itself will still sit properly and that the wax ring (or its waxless equivalent) can still make a complete, unbroken seal against the bottom of the toilet bowl. Sometimes, a flange sitting on top of the tile can create a slight rocking motion if it's not perfectly supported, or it might not allow the toilet to sit as snugly as it should.
Another scenario where you might see a flange seemingly “on top” is if the original installation was… well, let’s just say less than perfect. Perhaps the tile was laid, and then someone realized the flange was too low. In a rush, they might have just slapped a flange on top. This is a recipe for disaster, and I’ve seen the soggy consequences firsthand. Please, for the love of all that is dry and clean, do not do this unless you are using a specifically designed surface-mount flange.
The Dangers of a Flange Sitting Too High (On Top of Tile)
Let’s talk about the potential pitfalls of having the flange sit above the finished tile floor. Even if you’re using one of those “surface mount” beauties, you’re still relying on that connection. If the flange is too high, the wax ring might not compress evenly or fully. This means you could have gaps where water can seep out. And as we’ve established, nobody wants that.
Furthermore, a flange that sits too high can cause the toilet itself to be unstable. The toilet bowl has a specific design that allows it to sit flush with the floor and seal against the flange via the wax ring. If there’s a significant height difference, the toilet might not sit evenly, leading to rocking and potential stress on the flange and the wax seal over time. This can eventually cause leaks or even crack the toilet bowl.
Think of it like trying to balance a teacup on a stack of uneven coasters. It’s going to be wobbly, and eventually, something’s going to spill. The goal is a solid, level foundation.
What to Do When Your Tile is Already Laid
So, you’ve gone and done it. You’ve laid your gorgeous tile, and now you’re staring at the drainpipe, realizing the flange is sitting significantly lower than the tile surface. Don’t panic! We’ve all been there (or at least, I have, and I’m sharing my shame so you don’t have to repeat it). There are solutions.
The first and most recommended option is to use a raised toilet flange. These are specifically designed to add height to your existing flange. They essentially stack on top of your current flange, bringing the sealing surface up to the level of your finished floor. You’ll need to ensure it’s a secure fit and that the bolt holes align correctly.
Another option, as mentioned earlier, is a surface-mount flange. These are designed to be installed directly over the finished flooring. They usually come with a gasket or a sealing compound to create a watertight seal. Make sure you choose one that is compatible with your drainpipe size and type.
In some extreme cases, if the original flange is completely inaccessible or damaged beyond repair, and you have a lot of tile to work around, you might consider a repair flange kit. These are more involved and might require cutting into the subfloor or using special adapters, but they can be a lifesaver.
What you don’t want to do is just stack a bunch of random materials under the toilet to make it sit level, or try to caulk the gap. That’s a temporary fix at best and a guaranteed leak at worst. Invest in the right parts; your future self (and your downstairs neighbors, if you have them) will thank you.
The Role of the Wax Ring (Or Lack Thereof)
It’s impossible to talk about toilet flanges without mentioning the humble wax ring. This waxy donut is what creates the seal between the bottom of your toilet bowl and the flange. When you set the toilet, the weight of the toilet compresses the wax ring, forming a watertight barrier.
This is precisely why the flange height is so critical. The wax ring needs a flat, even surface to compress against. If the flange is too low and the tile is on top, the wax ring can’t seal properly against the flange. It might only seal against the tile, leaving the gap between the flange and the tile open to leaks.
Modern plumbing has introduced us to waxless seals. These are often made of rubber or foam and are designed to be more forgiving of minor imperfections in the flange or the floor. Some raised flanges and surface-mount flanges come with these built-in. While they can offer a bit more flexibility, the principle remains the same: you need a good, solid connection to prevent water from escaping.
So, while the flange is the anchor, the wax ring (or its modern counterpart) is the crucial sealing agent. And they work best when they have a perfectly matched stage to perform on.
Final Thoughts: Measure Twice, Flange Once!
The toilet flange and its relationship with your tile is a prime example of why paying attention to the little details in a renovation makes all the difference. It’s not just about aesthetics; it’s about proper function and preventing future headaches (and water damage!).
When in doubt, always assume the flange should be installed so that its top surface is flush with your finished floor. If you’re in the planning stages, consider your flooring material before you set the flange. If you’re dealing with an existing bathroom and have already tiled, don’t despair! There are solutions like raised or surface-mount flanges that can save the day.
My personal takeaway from my Saturday morning existential flange crisis? Always, always do your research, and when in doubt, consult a professional. Or, at the very least, watch a lot of YouTube videos and read a lot of forum posts. And remember the golden rule of home improvement: measure twice, cut once. Or in this case, measure twice, flange once!
May your toilets be stable, your seals be watertight, and your weekends be filled with less plumbing-related existential dread. Happy DIYing!