Can I Import Transactions From Excel To Quickbooks Desktop
So, you’ve got this giant spreadsheet. You know, the one with all your business transactions? And you’re thinking, “Is there any way to just… yeet this into QuickBooks Desktop? Like, without losing my sanity?”
Because, let’s be real, manually entering every single sale, every single expense? That’s a recipe for a major headache. And who has time for that when there are actual business things to do? Things like, you know, making money!
Well, lean in, my friend, because I’ve got some amazing news for you. The answer is a resounding, drumroll-please… YES! You absolutely can import transactions from Excel into QuickBooks Desktop. Phew, right? Let’s high-five virtually right now.
The Magic of Importing
This isn’t some futuristic, alien technology. This is just smart software doing its thing. QuickBooks Desktop, bless its accounting heart, is designed to make your life easier. And importing from Excel is one of its superpowers. It’s like a digital magic wand for your financial data.
Think of it this way: Excel is your super-organized scratchpad, and QuickBooks is your fancy, official ledger. You’re just moving your notes from one to the other. Easy peasy, lemon squeezy.
But before we dive headfirst into the importing abyss, there are a few things you need to know. Because, as with most things in life, there’s always a little bit of prep work involved. No free lunch here, folks! (Unless it’s a free coffee, then I’m all in.)
Getting Your Excel Sheet Ready (The Not-So-Scary Part)
Okay, so your Excel sheet might be a beautiful mess of colors and notes and maybe even a little doodle in the corner. We’ve all been there. But for QuickBooks to understand it, it needs to be a little more… structured. Think of it as getting dressed up for a fancy party. QuickBooks is the host, and it wants everyone to look presentable!
What does “structured” mean? Basically, it means your data needs to be in a specific format. And the most important part of that format? Column Headers!
Yes, those little labels at the top of your columns are your best friends right now. QuickBooks needs to know what each piece of information is. Is it a date? Is it an amount? Is it a customer name? Without those headers, it’s like trying to read a book with all the words jumbled up. Chaos!
So, you’ll need headers like:
- Date
- Transaction Type (like "Invoice," "Payment," "Expense")
- Customer/Vendor Name
- Amount
- Account (This is a big one! More on this later.)
- Memo/Description
And the list goes on, depending on what kind of transactions you’re importing. But those are the biggies. Seriously, don’t skip the headers. Your future self will thank you. And possibly send you a virtual thank-you note, complete with tiny animated confetti.
Formatting is Key, My Friends!
Beyond just having headers, the way you format your data matters. QuickBooks is a bit of a stickler for details.
For example, dates. Are they MM/DD/YYYY? DD/MM/YYYY? QuickBooks prefers a consistent format. Usually, MM/DD/YYYY works like a charm. If yours are all over the place, you might need to use Excel’s handy formatting tools to get them singing the same tune.
And amounts! Make sure they’re just numbers. No dollar signs ($), no commas (,), no extra spaces. Just the good old-fashioned digits. QuickBooks can usually handle it if you have them, but it’s safer to strip them out. Think of it as decluttering your data.
The Ever-Important Account Mapping
This is where things can get a tiny bit tricky, but also incredibly rewarding. You need to tell QuickBooks which accounts your imported transactions belong to. This is called account mapping.
So, if you’re importing sales, you need to tell QuickBooks whether that sale goes into your "Sales Income" account or your "Service Revenue" account. If you’re importing expenses, does that coffee machine payment go into "Office Supplies" or "Equipment Purchases"?
The best way to do this is to have a column in your Excel sheet labeled "Account." Then, you’ll list the exact name of the account as it appears in your QuickBooks Chart of Accounts. This is crucial. If the names don’t match perfectly, QuickBooks will throw a fit. And nobody wants a QuickBooks tantrum, right?
Pro Tip: Keep your Excel sheet open and your QuickBooks Chart of Accounts open side-by-side. This makes matching up those account names a breeze. It’s like a little game of financial matching!
The Actual Importing Process (Prepare for Glory!)
Alright, you’ve prepped your Excel sheet. It’s looking slick, professional, and ready for its close-up. Now, let’s get it into QuickBooks Desktop. You ready for this?
First things first, you need to open QuickBooks Desktop. Obviously. And then, you’ll want to navigate to the place where the magic happens. This is usually under the File menu. Look for something like Utilities or Import Data. The exact wording can vary slightly depending on your version of QuickBooks, so don’t panic if it’s not exactly what I said. Just follow your gut… and the menu options!
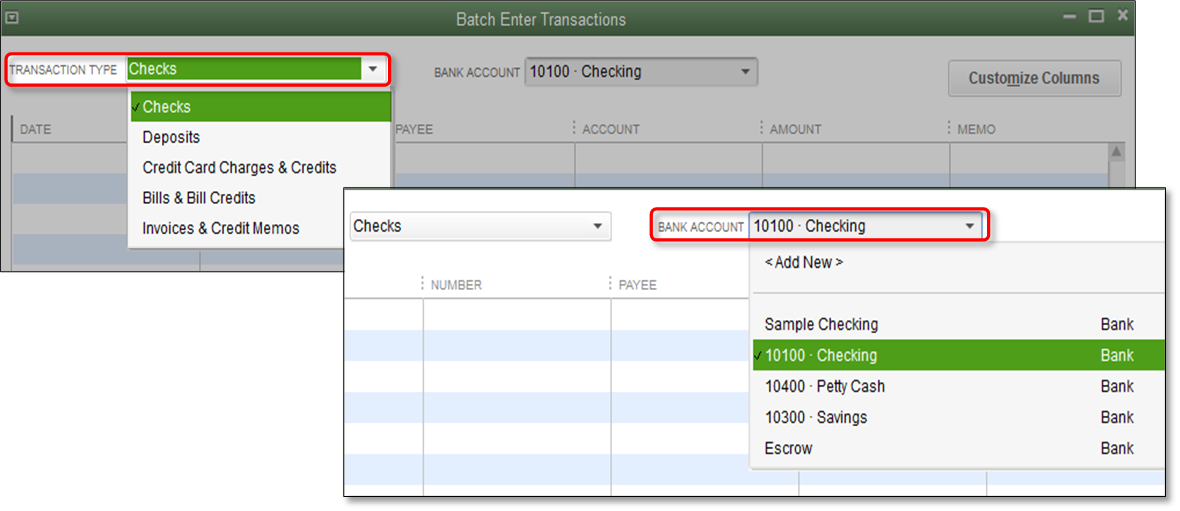
Once you’re in the import area, you’ll likely see options for importing different things: customers, vendors, chart of accounts, and yes, transactions. Click on the option for importing transactions. Ta-da!
Now, QuickBooks will ask you to select your Excel file. Browse to where you saved your beautifully prepared spreadsheet and select it. It might ask you about the format of your file – usually, it’s a .xls or .xlsx file. Just confirm it’s the right one.
Then comes the mapping part. This is where you tell QuickBooks which column in your Excel sheet corresponds to which field in QuickBooks. Remember those headers we talked about? This is where they shine!
You’ll see a screen with two columns. On one side, it’ll list the fields QuickBooks needs (like Date, Amount, Name, Account). On the other side, you’ll select the corresponding column header from your Excel sheet. For example, you’ll drag your "Date" header to QuickBooks' "Date" field. Your "Customer/Vendor Name" header to QuickBooks' "Name" field, and so on. It’s a drag-and-drop kind of situation, or you might have dropdown menus to choose from.
Don’t rush this part! Double-check your mappings. Make sure you’re not accidentally mapping your "Amount" column to the "Memo" field. That would be… messy.
Once you’ve mapped everything to your satisfaction, QuickBooks will usually give you a chance to review. It might show you a preview of how the data will look. Take a deep breath and do a final check. Is everything looking as it should?
The Moment of Truth: Importing!
After you’ve confirmed your mappings and reviewed the preview, you’ll hit the button. The big, glorious, “Import” or “Finish” button.
And then… you wait. It might take a few seconds, or if you have a lot of transactions, it might take a minute or two. Imagine that giant Excel sheet, zipping through the digital ether, slotting perfectly into your QuickBooks.
When it’s done, QuickBooks will usually give you a report. This report is your new best friend. It’ll tell you how many transactions were imported successfully and, crucially, if there were any errors. Pay attention to the errors!
Dealing with Errors (Because They Happen!)
Let’s be honest, life isn’t always perfect, and neither is importing data. You might encounter errors. Don’t freak out! It’s not the end of the world. It just means there’s a little bit of cleanup needed. Most of the time, the error report will tell you why a transaction failed to import.
Common culprits for import errors include:
- Mismatched Account Names: Like we discussed, the account names in your Excel file have to exactly match the names in your QuickBooks Chart of Accounts. Typos are the enemy here.
- Incorrect Date Formats: QuickBooks likes its dates in a specific order. If yours are wonky, it can cause problems.
- Missing Required Fields: If you’re importing invoices, for example, you generally need a customer name. If that’s missing for a transaction, it might not import.
- Duplicate Transactions: If QuickBooks thinks you’re trying to import the same transaction twice, it might flag it.
- Invalid Characters: Sometimes, weird characters in your data can throw things off.
The good news is, the error report usually points you to the specific row and the specific reason for the failure. You can then go back to your Excel sheet, fix the offending transaction (or transactions), and try importing just those specific ones again. It’s a little bit of detective work, but way better than re-entering everything manually!
What Can You Import? (The Nitty-Gritty)
So, what kind of transactions can you actually import? A whole bunch! This is where the real power lies.
- Invoices: Get those sales invoices into QuickBooks quickly.
- Bills: Track all your incoming expenses.
- Checks: Record your outgoing payments.
- Sales Receipts: For those immediate cash or card sales.
- Credit Card Charges: Keep your credit card activity up-to-date.
- Payments Received: Mark those invoices as paid.
- Deposits: Record money coming into your bank accounts.
The key is always having a clean, well-formatted Excel file and understanding how those transactions translate into your QuickBooks accounts. If you're importing sales, you need to map to your Income accounts. If you're importing bills, you'll map to your Expense or Cost of Goods Sold accounts, and potentially your Accounts Payable. It all ties back to your Chart of Accounts!
Is It Always Smooth Sailing? (Let’s Be Honest)
Look, I’d be lying if I said it’s always a perfectly seamless process. Sometimes, especially with older versions of QuickBooks or extremely complex spreadsheets, you might run into a few quirks. It’s rare, but it can happen. If you’re importing a huge volume of data, it’s always a good idea to back up your QuickBooks file before you start. Seriously, a quick backup can save you a world of heartache if something goes awry.
And if you’re still struggling, don’t be afraid to reach out for help. There are plenty of QuickBooks ProAdvisors out there who can lend a hand, or even just point you in the right direction. Sometimes, a little expert guidance is all you need to conquer the import beast!
The Bottom Line: Save Yourself Some Time!
Ultimately, being able to import transactions from Excel into QuickBooks Desktop is a game-changer. It’s a massive time-saver, reduces the chance of manual data entry errors, and keeps your financial records in tip-top shape.

So, next time you’re staring down a spreadsheet full of numbers, take a deep breath. Remember this little chat. You’ve got this! Get your Excel sheet prepped, map those columns like a pro, and let QuickBooks do the heavy lifting. Your wallet (and your sanity) will thank you for it. Now go forth and import!